Sunday, October 6, 2013

Pure Imagination

9:43 PM 3 Comments
There's a whole lot keeping me from blogging these days, but nothing is going to stop me from taking a moment on this night to share the story of a very special birthday for a very special kid.

This guy.

This guy who, six years ago almost exactly to the minute as I write, came into the world and made me a mama. Today we celebrate Finn Kimbell, an extraordinary little man.

Finn is a kid who lives life fully. When talking to my parents last night, I used the word "zest," and it is so fitting. He is tremendously expressive, enormously enthusiastic about new things and experiences, and gets ridiculously excited about the littlest moments. I love this about him.

It was months ago that Finn came up with the idea for a Willy Wonka and the Chocolate Factory-themed party. It's the perfect match for him - he is that kid who walks into the Chocolate Room with eyes wide open, an enormous grin spread across his face, eager and ready to take it all in. He is my Charlie Bucket.

The party itself was great fun. We invited six friends from his Kindergarten class, three girls and three boys. The invites had Wonka bars printed on the front and golden tickets inside (which several of the kids brought to secure admission at the door). We played a few games, opened a few presents, and then...we ate chocolate.

We happen to be the proud owners of our own chocolate fountain. Got it on Kohl's clearance years and years ago and have gotten a ton of use out of it since. The fountain served as our chocolate waterfall, and my awesome husband lovingly recreated the Chocolate Room around it - lollipops, gumdrops, snow caps, gummi bears, you name it. I made two dozen pumpkin cupcakes that I frosted to look like the mushrooms in the movie, and Sean added those to the tablescape. It was fantastic:


My personal highlight? When Finn declared it the best party ever after saying goodbye to his last friend and gave us both hugs. Because he's that kid, too.

Happy birthday, Finn. So much love.

I'm convinced that the secret to a good theme party is the perfect font. I found this Willy Wonka font at dafont.com.
Table yummies
Child's eye view of the fountain

Soda water + fruit juice

Mushroom cupcakes

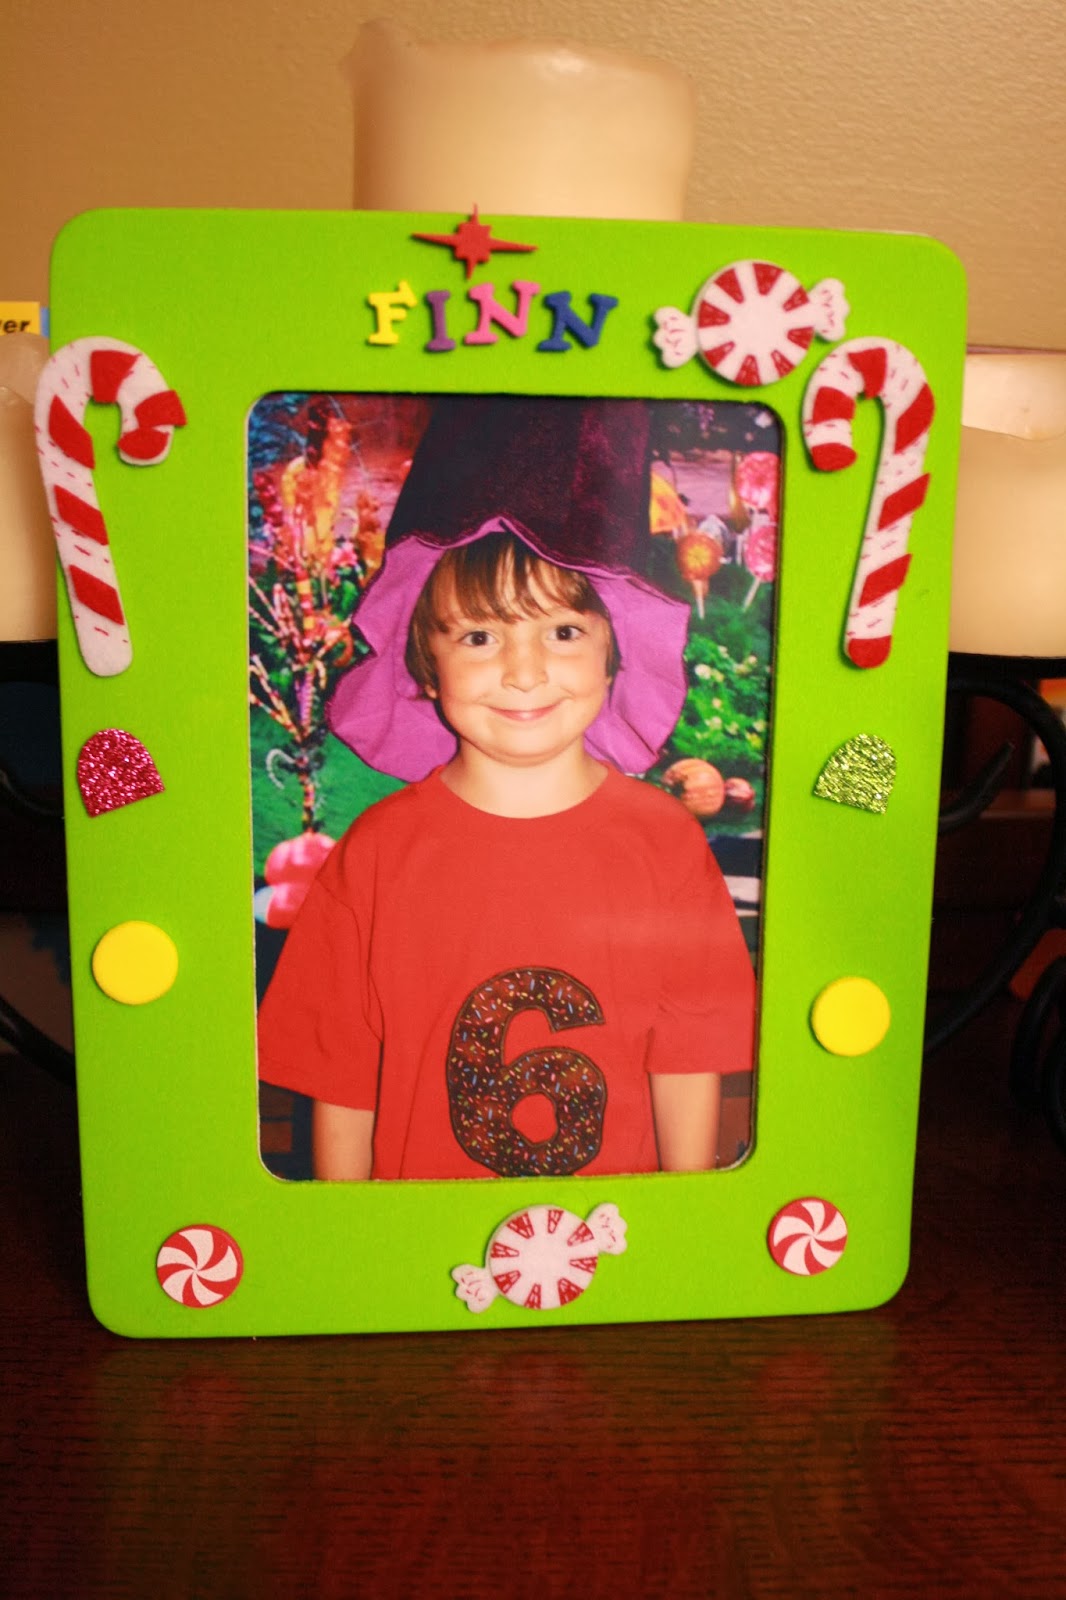
Party activity (take photos, make frames) + party favor


Thursday, July 18, 2013

No-Bake Energy Bites

1:19 PM 0 Comments
So a few weeks back, I attempted to make homemade breakfast bars with no success whatsoever. I really wanted to find a homemade alternative to processed snack bars - I find that when I am trying to eat healthily, I all too easily fall into the trap of purchasing granola bars and energy bars which - let's be honest - just aren't all that healthy and are far more expensive that the sum of their parts. I definitely have a sweet tooth, so while I appreciate the thousands of articles recommending that I snack on almonds or celery sticks, I need a little sugar to get me by, particularly in the afternoons.

I found this recipe referenced in a magazine that my husband's cousin Ami left at the house when we were in Helena. This is the perfect opportunity to give Ami a shout-out since she informed me that she checks my blog every morning for updates - how's that for loyalty? With deepest apologies for the long, silent weeks, Ami, I thank you for leaving behind that magazine which led me to this awesome recipe! You rock!

These are crazy good. You probably have everything you need to make them right now, so walk away from your computer and go do that. There is lots of information on substitutions, etc. on the original blog which is linked below. The only thing I changed from the original recipe is the amount of coconut - my first batch seemed a bit flaky, so I cut back.

Enjoy!


No-Bake Energy Bites
adapted from Smashed Peas and Carrots

PRINT ME!

1 cup oatmeal
1/2 cup peanut butter (or other nut butter)
1/3 cup honey
1/2 cup coconut flakes
1/2 cup ground flaxseed
1/2 cup mini chocolate chips
1 tsp vanilla

Mix everything above in a medium bowl until thoroughly incorporated.  Let chill in the refrigerator for half an hour.  Once chilled, roll into balls and enjoy!  Store in an airtight container and keep refrigerated for up to 1 week. (NOTE: They will not last one week. Guaranteed.)


Tuesday, July 16, 2013

Jiggity Jig

3:26 PM 0 Comments
We're home. Sigh. It was a lovely, lovely vacation, filled with family and friends and beauty and happy kids.


When it comes to food, two things happen on the flip side of a vacation: we come home with a renewed commitment to healthy eating (generally brought on by weeks of microbrewed beer consumption and an "I'm on vacation" mentality), and we always come home to a fridge so empty it takes a good week to get it back to snuff. We've been home three days now, and I've spent a fair amount of energy on the latter. There are a few things we just always like to have in the fridge: staples, like milk and bread and cheese and eggs, and homemade items, like yogurt. Since we also came home to a vegetable garden two feet taller than the vegetable garden we left, Finn and I spent a good portion of yesterday afternoon making pesto which found itself on whole wheat penne last night and will end up on a pizza later this week (while not a huge fan of packaged pizza dough, we're kind of crazy about the Pillsbury Artisan Whole Wheat Crust -- so good to have on hand!).

We ate a lot of hummus in Montana (I went to Costco for the very first time...wowzers!), but I really never tire of the stuff. It's great to have on hand when dinner isn't quite ready but the kids are already hungry. I liked the Costco stuff a lot (which is a good thing, since the container of it was ginormous), but I really like this easy recipe as well...it's super easy to throw together on a weekly basis. Feel free to add ingredients to your heart's content (olives, roasted red peppers, etc.) - I'm somewhat of a hummus purist, but you can easily customize this basic recipe.

Happy summer, all!

Quick Hummus

PRINT ME!

1 16 oz. can chickpeas
~1/4 cup liquid from the can
3 tbsp lemon juice
1 1/2 tbsp tahini
2 cloves garlic, minced
1/2 tsp salt
2 tbsp olive oil

Throw garlic cloves into the food processor and pulse to mince. Add the chickpeas, the lemon juice, the tahini, and the olive oil. Add a bit of the liquid from the can, then a bit more, until you reach the desired consistency. Once blended, add salt to taste.

The key ingredient here is the liquid from the can. I've tried lots of hummus recipes and could never get the texture quite right. This is super yummy, super economical, and super easy to throw together. Tahini is the only unusually ingredient; however, once you buy a jar to make this once, you'll have it on hand whenever you want to make more.

Thursday, June 27, 2013

When blogs go wrong

11:54 AM 1 Comments
I had the best idea for getting back into this blogging thing. As mentioned in my previous post, we're getting ready for our annual trip to Montana. I remembered that I had filed away a recipe I found online for homemade breakfast bars, and thought that would be just the thing for our bright and early departure.

It was the perfect recipe. Healthy, full of nuts and oats and good stuff, I could make it in advance and pack it for the car. Oh yes, it was going to be a grand re-entrance to the blogging world.We were going to enjoy those bars all the way through Illinois, Wisconsin, and Minnesota.

Once I started assembling the ingredients, it seemed a bit off...sort of like soggy oatmeal baked until it becomes bar-like. But I plunged forward, determined to provide my family with sustenance for the eight hour adventure.

Finn joined me in the kitchen, so I was able to get the obligatory "my kid helps me cook!" photo:

I couldn't find an 8x8 pan, so I thought I'd try something different (this was perhaps my fatal error); instead of throwing the mix into a parchment paper lined pan, I (or rather Finn) spooned it into a greased mini muffin pan. And then we put it into the oven to bake.

Finn and I spent the next 35-40 minutes working on a sewing project. All was feeling right in the world. The buzzer beeped, we went into the kitchen, pried the "breakfast bars" out of the pan, took a bite, and both spit it out. "It takes like burnt oatmeal," Finn says. I couldn't agree more. Epic fail.
 

When Emmett woke up, he and Finn decided to scrape out what they could from the muffin pan. And, well, I let them...they were destined for the trash can anyway. Emmett was the only one who found them bearable, but even he rejected them eventually.

So there you have it. My completely honest disclosure that not every blog-bound effort is wrapped up in sunshine and daisies. Time to go find something new to make for the trip. Or perhaps we'll just bring a loaf of bread and a jar of peanut butter...


Monday, June 24, 2013

On the Road Again

4:51 PM 0 Comments
I can't believe a year has passed since we were preparing for our epic road trip last June. So much has changed - Finn is getting ready to start Kindergarten, Emmett is a lot less baby and a lot more boy, Sean is a permanent principal, I'm a year into this full time working mom gig - and yet some things feel exactly the same. Despite all the external things that pull us in different directions through the school year, our world remains focused on the four of us, finding our rhythms, sitting down to dinner each night, appreciating the time we are spending together.

We're preparing to head to Montana once again - this time our journey involves a day's drive to visit dear friends in Minnesota then flying from there to Helena. Eight hours in the car + 2.5 hours on an airplane. And the thing is, I'm kind of sad about it. Sure, three days in the car had its ups and downs, but ultimately we arrived at Grandma and Grandpa's none the worst for wear and maybe even a little closer. I loved that crazy road trip last summer that took us through nine states and allowed us to see so many friends and family members in so many different places.

There's preparation to be done, regardless of the means of travel. I'm getting the bags packed up once again, and I'm loving that we don't have any diapers or strollers or portable cribs on this trip. Just four people and four suitcases. How did that happen?


This awaits. And we can't wait.

Friday, May 3, 2013

An unexpected day at home + a perfect spring risotto

9:58 PM 0 Comments
I'm just a few short weeks from completing my first school year as the full time working mother of two, and I think that overall it has been a success. When I am home, I'm happy to be home; when I am at work, I'm happy to be at work...so I guess that is a win. But on those occasional days when I've got a sick kid who has to stay home from day care, I like to pretend I'm still a stay at home mom. The thing is, I'm really good at it. My boys and I spent those two and a half years fine-tuning a highly functional system, and when I'm unexpectedly handed a day at home with the kids, it comes back so naturally. Don't get me wrong, having a sick kid is, hands-down, the hardest part of being a working parent, particularly when you work in education and have to deal with subs and sub plans and the terror of finding out what happened in the library in your absence the next day. But once I've got the professional details handled, I sink so happily into the familiarity of being home with my boys.

Emmett came down with an out of nowhere crazy high fever at dinner time last night. Finn could have gone to school but, as he so eloquently explained to me this morning, "I just kind of feel like I need a day at home." Don't we all, kid? So home we stayed. Sean actually spent the morning with the boys and passed the baton to me at lunchtime when I returned from a morning at work. And how did I spend my afternoon? In between stories and snuggles and naps, I made a batch of homemade chicken broth which led naturally into making a wonderful pot of risotto.

Risotto is, in my opinion, the perfect dish for enjoying the experience of being in the kitchen. It's not super quick, and it is definitely not hands-off, but for those evenings when you have the time and inclination to stand at the stove stirring, it can be a really blissful process. Tonight was that night for me. This recipe features the beautiful spring flavors of asparagus and baby peas...so if your farmer's market, like mine, kicks off the season this weekend, get your hands on some early asparagus and make some of this. You won't regret it.

Happy spring, all!


Asparagus and Pea Risotto
Adapted from Weight Watchers


1 bunch asparagus, trimmed and cut into 1 1/2 inch pieces
3 - 14 1/2 oz. cans reduced sodium vegetable or chicken broth
1 tbsp. olive oil
2 leeks (white and pale green parts only), cleaned and chopped
3 garlic cloves, minced
1 1/2 cups Arborio rice
1/3 cup dry white wine
1 cup frozen baby peas
1/2 cup grated Parmesan
salt and pepper to taste
  1. In a large saucepan, bring the broth to a boil. Add the asparagus and cook three minutes. Use a slotted spoon to remove all the asparagus from the broth. Set asparagus aside to cool.
  2. Lower the heat under the broth and keep at a simmer.
  3. Heat the oil in a large skillet over medium heat. Add the leeks and garlic; cook until softened, about 3 minutes. Add the rice and cook, stirring, until coated with the oil, about 1 minute. Stir in the wine and cook, stirring constantly, until it is absorbed. Add the simmering broth, 1/2 cup at a time, stirring until it is absorbed before adding more, until the rice is tender but firm in the center, about 20 minutes total.
  4. Stir in the asparagus and peas with the last addition of broth. Stir in the Parmesan and season with salt and pepper. Serve immediately.

Sunday, April 14, 2013

Our Little Buckaroo - Part II

11:26 AM 1 Comments
After returning from our cowboy adventure on the beautiful River to River Trail of Southern Illinois, it was time to buckle down and get ready for a "Wild, Wild West" birthday party. Highlights included hot dogs cooked over the fire pit, a half dozen neighborhood kids in cowboy hats running around, plenty of bluegrass music, and Emmett's constant state of cowboy joy. A few decorations, a few ideas pulled off the Internet, and voila! it was a party indeed:

Cowboy clothing for visiting buckaroos

"Happy Trails Mix" for the goodie bags

A last minute pennant made with horseshoe ribbon, cardstock, and a free Western font

Lemon cream cheese cupcakes in a cast iron skillet

Make a wish!

Okay, let's be honest. The real highlight was the cake, a ridiculously delicious and sinfully sweet s'mores ice cream cake that I am certain cowboys ate ALL THE TIME. And if they didn't, they should have.

In the spirit of full disclosure, I made the cake in a 9x13 pan for the birthday and, a few days later, made it again as a pie. I liked the pie version quite a bit better, so that is the recipe I will share with you today. It takes some time to assemble, but most of the time is hands-off, so just be certain to plan ahead.

I froze the last few slices of pie and just rediscovered them in the freezer last night. Sean and I were both amazed that it froze so well - we thought the marshmallows would turn hard as a rock, but they didn't...which, when you think about it, is kind of odd, but let's try not to think about it.

Enjoy!


S'mores Ice Cream Pie
Serves 8 (or 4 really hungry cowboys)

PRINT ME!

1 3/4 cups graham cracker crumbs
6 tbsp. melted butter
1 12.8 oz jar Hershey's hot fudge topping
Vanilla ice cream
1/2 of a 10 oz. bag mini marshmallows
1/4 cup chocolate chips (optional)

In a large bowl, combine melted butter and 1 1/4 cups graham cracker crumbs. Mix until moist. Press into an 8 or 9 inch pie pan, evening the crust out with the back of a spoon. Place in the freezer to set for about fifteen minutes.

Once set, remove crust from freezer. Pour most of the contents of the jar of hot fudge sauce into the pie crust. Put back into the freezer and freeze for 2 hours.

About 15 minutes before the crust is ready, take the ice cream out of the freezer to allow it to soften. Once soft, press and spread the ice cream on top of the fudge sauce. Use a wet metal spoon to smooth the ice cream. The amount of ice cream you need will depend on the size of your pie pan - fill it up! Put the whole thing back in the freezer and allow to set for at least 2 hours, or even overnight.

Before serving, dump half the bag of marshmallows onto a rimmed cookie sheet. Place under the broiler for 1-2 minutes until toasty brown - watch closely! Remove pie from freezer and sprinkle with 1/4 cup graham cracker crumbs. Carefully transfer the toasted marshmallows to the top of the pie with a wide spatula. Sprinkle with remaining graham cracker crumbs and chocolate chips. Serve!


Thursday, April 11, 2013

Our Little Buckaroo - Part I

12:30 PM 2 Comments
Emmett is in the midst of one of those wonderful toddler phases wherein he doesn't just like cowboys...he sincerely thinks he is a cowboy. He spends his evenings trotting around the house on a stick horse and if he doesn't wear his cowboy boots to preschool, he most certainly puts them on upon his return.


It was therefore not at all difficult to decide on a theme for his third birthday.

Emmett's birthday happened to fall over spring break. Since we were planning on taking a little family getaway anyhow, Sean and I decided to pull all the stops and plan a cowboy overnight. So we headed to southern Illinois to stay in a cabin that we had rented many times many years ago (check it out!) and found an outfitter who was willing to take a just-three and a five-year-old along on a trail ride. That's right, my friends, horseback riding.

I let Emmett pick the dinner for his birthday night and, because I am a firm believer in showing up to rental houses with a meal ready to go, I was quite pleased with his selection. It was a three-year-old feast, ooey gooey super delicious baked macaroni and cheese (which I admit to finding by Googling "best macaroni and cheese ever") and a gigantic bowl of berries. I popped the mac and cheese in the oven while we opened presents, and it was warm and toasty by dinner time.


We met up with our guide the following morning and set out on a two and a half hour horseback riding adventure. This was no pony ride at the carnival - the trails were steep and slippery and there were more than a few slightly terrifying moments. Our guide knew it, and Sean and I knew it, but the birthday boy didn't have a clue; he rode in front of either Sean or me, hooping and hollering and calling out "yee-haws" the whole time. 

Cowboyed up

Big boot, little boot


The birthday cowboy and his mama


This is the stuff of parenting dreams and, I'd like to think, three-year-old dreams, too. It was perfect.


Upon our return home, we had a cowboy-themed birthday party for friends and neighbors. I'll be back with the details of that, including an off-the-charts recipe for s'mores pie. Waa-hoo!

Monday, March 25, 2013

Sunday Dinner: Couscous and Bean-Stuffed Eggplant with Garlic Tomato Sauce

7:42 AM 0 Comments
It snowed here yesterday. A lot.


Ignoring the fact for a moment that it is March 25th, it is a beautiful snow - the trees are decked out in thick layers of white, their delicate bud-covered branches weighed down by the heft of it. We spent most of Sunday afternoon watching from inside and waiting for the snow day to be called. It was.


I wasn't planning on making anything particularly impressive for dinner; it was, after all, the last day of spring break. But when it started looking more and more like spring break was going to last one day more, I got creative, with delicious results. This is a combination and modification of several recipes from my newest favorite cookbook - The Vegetarian Family Cookbook by Nava Atlas. There are admittedly a lot of steps, but none of them are difficult and many are hands-off. I had some roasted tomato sauce in the freezer that I blended to a puree and used to top the eggplant, but feel free to use a jarred sauce - I'd recommend something somewhat light.

This recipe is infinitely adaptable by switching out the type of bean and seasoning. As written in the book, the recipe calls for black beans and cumin, which we might try next time with plain couscous and salsa in place of the tomato sauce.

Hope you enjoy it - it was a big hit around here.


Couscous and Bean-Stuffed Eggplant with Garlic Tomato Sauce
Adapted from The Vegetarian Family Cookbook

Makes 6 eggplant halves

PRINT ME!

3 medium eggplants
1 5.6 oz box couscous with toasted pine nuts
1 can cannelini beans, drained and rinsed
1 tbsp. olive oil
2 cups prepared marinara
grated Parmesan
  1. Cut off the stem ends of the eggplant and slice in half lengthwise. Slice a tiny bit off the rounded side to allow the eggplant to lie flat. Place eggplant shells in a 9x13 baking dish and set aside.
  2. With a sharp knife, carefully cut away the pulp. Don't worry about making it pretty or uniform - you are going to chop it in a minute. Leave a sturdy shell about 1/2 inch thick. 
  3. Chop the eggplant pulp finely and steam until tender (about 10 minutes). Set aside.
  4. Prepare couscous according to package directions. 
  5. In a large bowl, combine prepared couscous, steamed eggplant, beans, and olive oil. Season with salt and pepper.
  6. Preheat oven to 375. Evenly divide couscous mixture among six eggplant halves. Cover loosely with foil and bake at 375 for 30 minutes. 
  7. Uncover and bake 10 to 15 minutes more, until shells are tender but have not yet collapsed.
  8. During the last 10 minutes of baking time, warm up the marinara sauce.
  9. Top each eggplant half with warmed marinara and a sprinkle of grated Parmesan.
Enjoy!

Thursday, March 21, 2013

St. Patrick's Day Biscuits

6:52 PM 0 Comments

We take St. Patrick's Day pretty seriously around here. In the old days, that meant a lot of loud Irish punk and some serious pub carousing. Now we settle for excessive amounts of green clothing, nothing but traditional Irish music on the iPod, and cold beverages in a can poured perfectly into pint glasses (see here) enjoyed from the comfort of our own couch. For the last few years, we've attended our church's St. Patrick's Day program, and this year we somehow landed ourselves on the planning committee. It was a blast - Irish stepdancing, snake hunts, cake walks, an appearance by St. Patrick. With all that on the agenda, we managed to talk my parents into coming down for the day...and they brought along my aunt, my eleven-year-old niece, and my eight-year-old nephew. My boys were completely surprised, and the day was subsequently even more fun than anticipated. There is nothing quite as exciting as a group of surprise visitors at the door, especially when the group includes cousins.

We started the day with St. Patrick's Day brunch. This recipe was soooo yummy, and really easy to throw together. I made the biscuits the night before so all I had to do when everyone arrived was warm the biscuits, fry up some eggs, and stack it all together. Yum. As written, the recipe makes 8 to 10 biscuits, but because you only use half a biscuit for each serving, you end up with a lot of extra biscuits. If you are serving a bigger crowd, just make more eggs. The ham is totally optional; use it if you like it, skip it if you don't. I opted to double the recipe and freeze lots of leftover biscuits; we had them for dinner tonight with baked potato soup and enjoyed them all over again.

In addition to tasting good, the biscuits are really pretty to look at. I did not manage to take a decent picture, but the one on the Betty Crocker website gives you a good idea.

It wouldn't be a holiday without a little custom applique...


Happy March!

St. Patrick's Day Biscuits
Adapted from Betty Crocker

PRINT ME!

Makes 8-10 biscuits / 8 servings + leftover biscuits

1 package frozen creamed spinach, thawed
2 3/4 cups Bisquick mix
3/4 cup shredded Parmesan cheese
1/4 tsp. ground mustard
2 Tbsp. butter
8 eggs
2 Tbsp. butter, softened
1/4 lb. sliced deli ham (optional)

1. Heat oven to 425 degrees.

2. In medium bowl, mix spinach, Bisquick, cheese, and ground mustard just until dry ingredients are moistened. It seems like you need to add liquid, but you really don't - there is enough in the spinach.

3. On a lightly floured work surface, knead dough eight to ten times. Pat to 3/4 inch thickness; cut with 3 inch round cutter. You should get 8-10 biscuits.

4. Place rounds one inch apart on ungreased cookie sheet. Bake 13 to 16 minutes or until golden brown (can be done in advance).

5. In a nonstick skillet, fry eggs to desired consistency in butter. Season with salt and pepper.

6. Split 4 biscuits and spread cut sides with softened butter. Reserve extra biscuits for a later use.

7. Top each biscuit half with a slice of ham and one fried egg.


Sunday, March 10, 2013

Chocolate Chip Heaven

6:04 PM 2 Comments
My husband Sean is not a fan of recipes; he is far too casual a cook to follow someone else's instructions. His favorite day to make dinner is the day when I look at the crossed-out list of meal options on the fridge and swear there is nothing to eat. He then opens the fridge, roots around, and comes up with something delicious and surprising.

While not a recipe guy, he is very much a technique guy. Most recently, he caught a video on chow.com about how to make the perfect chocolate chip cookie and decided he had to give it a try.

I concur. They were the best chocolate chip cookies I've ever had -- chewy and chocolatey and sweet and moist. They tasted best -- of course -- right out of the oven, but we had no trouble eating the rest after the boys went to bed. Don't judge; I know you do it too.


The recipe came from The Bon Appetit Cookbook, but Sean swears it is not the recipe but the techniques that made them so crazy good. Here are his specific tips:
  • The eggs and the butter should be room temperature. You can speed the eggs along by putting them in a cup of warm water for about ten minutes.
  • Use the whisk attachment on your stand mixer to beat the butter, sugar, eggs and vanilla. Beat it really well. Switch the whisk for the paddle attachment before adding the flour.
  • Mix the flour in as minimally as possible - just until incorporated.
  • The better the chocolate, the better the cookie. A no-brainer, but worth mentioning before you head to the store. Sean recommends using an equal amount of flour and chocolate chips. This makes really, really chocolatey cookies.
  • Sean made our cookies extra big and thus adjusted the time accordingly. As a general rule, remove the cookies from the oven before they look completely done. You'll be glad you did.
Enjoy!

Chocolate Chip Cookies
Adapted from The Bon Appetit Cookbook
Makes about 30

PRINT ME!

Nonstick vegetable oil spray
3 cups all purpose flour
1 tsp. baking soda
1 tsp. salt
2 sticks unsalted butter, room temperature
1 cup white sugar
1 cup packed brown sugar
2 large eggs, room temperature
2 tsp. vanilla
3 cups semisweet chocolate chips

Preheat oven to 325 degrees.

Spray a large rimmed baking sheet with spray.

Whisk flour, baking soda, and salt in medium bowl to blend. Set aside.

Using a stand mixer with the whisk attachment, beat butter until light and fluffy.  Add sugar and brown sugar; beat until well blended. Add eggs and vanilla; beat until creamy and well blended.

Switch whisk attachment for paddle attachment. Gradually add flour mixture, beating just until incorporated. Stir in chocolate chips.

Working in batches, drop dough by heaping tablespoonfuls onto prepared baking sheet, spacing three inches apart. Bake cookies until pale brown, about 15 minutes.  Cool 15 minutes on sheet. Transfer to racks to cool completely.


Friday, February 1, 2013

Knit and Purl for Mama

11:50 AM 4 Comments

I taught myself to knit in the fall of 1997. I was in India on study abroad and, after three months spent with a large group of American students at a monastery in Bodh Gaya, found myself alone and very cold in the mountain town of Darjeeling for the independent study portion of the semester. After months of intense communal living, the solitude was somewhat comforting, and when I came across a shop that sold yarn and needles, I picked up a few supplies. A college friend had shown me the basics prior to this, so I was easily able to get started. I knit a scarf for my mother, who I was missing, and another for my then boyfriend, who I was missing as well. When it came time to cast off, I toted my project down to the front desk of the Tibetan guest house where I was staying and, without a common language, asked the Tibetan woman there who was often knitting to show me how. I can see her smile so clearly in my mind.


When I decided to join the Peace Corps a year and a half later, I once again found myself alone and very, very, very, very cold (I was assigned to northern Mongolia). I knit a lot. I mean like a crazy lot - I made my friends sweaters and scarves, mittens and hats. I constantly wrote home asking for more yarn, and I collected yarn on countryside visits (which is why I still have six skeins of scratchy camel wool under my bed waiting for a project). I mastered the art of knitting while reading at the same time, so I'd sit by my wood stove with needles in hand and a book balanced on my knees while outside temperatures hovered around -40 degrees. I spent months and months like this.

When I reflect retrospectively on my fifteen year relationship with yarn and needles, there's a theme that runs throughout; I seldom knit for myself. For me, knitting has always been a meditative act; there is something about the rhythm of moving two sticks and a length of yarn together that breeds a reflective quiet in my mind. I like to think of each stitch as a thought for the recipient, be it a distant friend or a soon-to-be-born baby. Okay, that is a bit overstated: there are plenty of times when I am on a timeline and just want the darn thing to be finished...but I'd like to think that the majority of my gifted projects are knit up with tiny little wishes worked into the stitches.

This long-winded introduction is to bring you up to date with my thoughts as of late. My wonderful and amazing mother had gastric bypass surgery last week, and I knew months ago that I wanted to make her an afghan to have around the house during her recovery. That does not mean that I had the wits about me to get started on a afghan months ago, however, so when it suddenly got to be January, I found myself frantically looking for a quick pattern online. Two words. Big needles. Really stinking big needles. This Lion Brand pattern claims to be a six hour project. I don't know if I finished it in six hours since I don't think I've had six consecutive hours to knit since I got home from Mongolia. But I can decisively report that it was really fast, really easy, and super cozy. I particularly like the heft of the blanket - the four strands of yarn held together lend a lot of weight to it. As a bonus, it kept my knees warm while I worked on it.

My mom is recovering beautifully, and it was an absolute joy to present her with this blanket last weekend. I like to think of her covered in my stitch thoughts as her body figures out its many changes..and I am glad, on these cold winter days, that she is warm.


Saturday, January 26, 2013

Bugs

8:27 PM 0 Comments
Our house has been overtaken by bugs -- not the six legged variety, but the itty bitty kind that manifest as aches, chills, fevers, nausea, coughs, headaches, and runny noses. No one is super sick, but everyone is a little bit sick with a whole spectrum of different symptoms. It was therefore not difficult to declare this chilly Saturday a stay-at-home-and-take-it-easy kind of Saturday. It's 5 pm and the boys are still in their pajamas, and I think we're all feeling a little stronger for the R and R.

With the boys deeply entranced in Harry Potter and the Sorcerer's Stone (the latest obsession around here - they spend most of their days chasing each other with chopstick wands), I found myself on Pinterest whilst half watching the film. As a result, I added a dozen projects to my sewing and knitting boards, found a DIY washing machine cleaner that I am presently testing out, and decided to make a healing pot of chicken noodle soup.

I didn't change too much about the original recipe, save for the addition of roasted garlic. It just seemed that a soup commissioned with eradicating various and sundry bugs from the house should have some garlic in it, and since I had time while the stock simmered, I threw a handful of cloves into the oven to roast. Suffice it to say, the house smells amazing.

With wishes of health from my family to yours...


Homemade Chicken Noodle Soup
Adapted from Simply Scratch

PRINT ME!

FOR THE CHICKEN STOCK:
1 store-bought rotisserie chicken
2 carrots, roughly chopped
2 celery stalks, roughly chopped
1 onion, roughly chopped
A couple sprigs of fresh parsley, roughly chopped
2 sprigs of fresh thyme
1 bay leaf
A half teaspoon of whole peppercorns
12 cups water

FOR THE SOUP:
10-15 cloves garlic
1 Tbsp. olive oil
2 carrots, peeled and sliced
2 celery stalks, washed and sliced
1 small yellow onion, diced
1 teaspoon salt
1/2 teaspoon fresh ground black pepper
1 teaspoon chopped fresh thyme
4 packets of liquid stock concentrate (I used Swanson Flavor Boost)
2 cups light and dark shredded chicken
1 12 oz. package kluski noodles
1 tablespoon sea salt


To begin, prep the chicken: dice the white and dark meat and put it in one bowl, throw the bones and skin and little leftover pieces into a large stock pot. Place the diced chicken in the refrigerator for later. You should have about 2 cups.

Preheat the oven to 450 degrees.

Brown the chicken parts in the stock pot over medium high for a few minutes. Then throw in the roughly chopped carrot, celery, onion, parsley, thyme, bay leaf and peppercorns. Pour in 12 cups of water and scrape up any browned bits that are on the bottom of the pot. Cover and bring up to a simmer with the lid on, for one hour and thirty minutes.

Place the unpeeled garlic cloves on a square of aluminum foil. Top with the olive oil and wrap, lifting and twisting the corners to form a small packet. Roast at 450 degrees for 15-20 minutes, until soft. Set aside to cool.

After the hour and a half is up, drain the stock through a strainer into another large pot. Discard the remaining bones/vegetables.

Bring the stock back up to a simmer and add in the two diced carrots, celery and onions. Add in the teaspoon of kosher salt, the half teaspoon of black pepper and the chopped thyme. Squeeze the garlic out of the the skins into the soup. Cover and let simmer until the vegetables are tender, about ten minutes.

Meanwhile bring a second pot of water to boil (I reused my original stock pot so as to save dishes). Season with sea salt and drop in the noodles. Cook according to package directions. Drain and then add into soup along with the diced chicken and stock concentrate.

Stir and simmer until chicken is warmed through.

Enjoy!

Sunday, January 20, 2013

Weekday Winner: Corn Bread Casserole

10:21 AM 0 Comments
I haven't posted a weekday winner in a while, but this is just the recipe for my comeback. I have loved this dinner for years, and it meets all the qualifications for a great weeknight meal - family-friendly, easy to make, quick to assemble then hands-off to cook. I wish I could tell you where I got the recipe from, but I wrote it by hand years ago into a notebook where I sometimes stick recipes and thus have no source.

This makes enough for dinner and leftovers. The photo below shows the casserole  as it looks in the first step. It's not the prettiest casserole once you dish it out and put it on a plate but, as my grandpa use to say, "it all goes to the same place."

Enjoy!

Corn Bread Casserole
Serves 8

PRINT ME!

1 8 oz. can corn, drained
1 15 oz. can kidney beans, half drained
1 15 oz. can black beans, drained
2 c. shredded cheddar cheese
1/2 c. chopped green onions
1 tbsp. chili powder
1 tsp. cumin
1 package cornbread mix (plus one egg and some milk as directed)

  • In a large bowl, mix together everything but the cornbread.
  • Pour into greased 2 quart baking dish.
  • Make cornbread according to package directions. Spread over the top of the bean mixture.
  • Bake at 350 degrees for 35-40 minutes.
  • Serve with plain yogurt or sour cream. 


Sunday, January 13, 2013

The Dawn of "Dapper Dinner"

2:00 PM 3 Comments
January can be a rough month; the holidays are over, spring is in the distant future, the days are cold, the nights dark. Sean and I had several discussions on this topic during the last lingering days of our winter break, and we decided to get proactive.

As you may recall, during the month of December our kids had an advent calendar that, in addition to chocolate, suggested daily fun activities for the family. I was a bit ambivalent going in, as the daily activities could have very easily lapsed into "another thing to do" at what was already a super busy time of year, but for the most part that didn't happen. The kids loved the experience and as a family we spent more time together doing the activities than we may have on a typical weeknight.

So we decided to kick off January with a brainstorming session of fun things to do and to attempt an activity a night. Listed among the ideas (which ranged from "themed movie night" to "build a marble run" to "have a dance party") was "have a fancy dinner." This event was shortly thereafter renamed "Dapper Dinner" by Finn: according to his teacher, this is his favorite word and is used at least five times a day.

Here's how it works:
  • Plan a dinner that is slightly fancier than your usual weeknight fare.
  • Pick a night. I highly recommend Friday - this is a night that all too often feels like any other weeknight, and "Dapper Dinner" made it feel extra special.
  • Dig through your closets and find your fanciest duds. This is a great opportunity to put your kids in those dressy hand-me-downs that you may not have an opportunity to use otherwise. It's also a chance to trade in your mom clothes for a night. Finn was amazed by my dangly earrings (which I'm fairly positive I got in 1992 for my sister's wedding...).

Sean dressed the boys while I finished making dinner, and when Finn came down wearing a courderoy sport coat and one of his dad's ties, my heart melted:


Emmett followed close behind in his little blue sport coat and "lellow" tie:


And you know what? The night felt super special. We had crackers and olives for appetizers and let the boys drink sparkly water out of wine glasses. We played the "Cool Jazz" station on Pandora and danced around the living room with the boys. We ate a fancier than usual dinner (how often do we get to use those napkin rings we got for a wedding gift?) and had berries and whipped cream in shiny glasses for dessert. We had fun together.

I have a feeling that this will be the first of many "Dapper Dinners" at our house. But we won't have it too often, or it wouldn't feel special. 


Happy January, everyone!


Thursday, January 3, 2013

Holiday Images

2:49 PM 1 Comments
December was an abundantly full month for our family. Here are a few favorite pics from the holiday season. I am, as always, "hopeful" that I can find a way to write more often in the months to come; in the meantime, I hope 2013 is off to a wonderful start for everyone!

Brother love at the Christmas tree farm.
Always focused...
...and far more interested in THIS stuff
than in finding a tree.
Under the tree in red pajamas.
Bookmark presents for teachers: art by the boys, scanned,
printed on cardstock, laminated, and ribboned.

A perfect pre-Christmas snow.
"Make Santa beards in the tub" - an advent calendar activity.
Best effort at a Christmas Eve family photo;
Sean and I can't stop laughing because Finn won't stop dancing...

Christmas morning quiet...and our BIG ol' tree...
Cowboy boots and Star Wars books. Nuff said.
My new 50mm fixed lens!
Playing a polka...
...and eating smores.

New Years Eve ready.