I remembered that stockpile of fabric a few weeks ago when I was thinking about Claire's upcoming fifth birthday. I thought perhaps I could make her an apron, and the World Wide Web, in a moment of grace, gave me exactly what I was looking for. I am so ridiculously excited about this project and about this super easy, super user-friendly tutorial at Stardust Shoes.
 | |
| Classic Reversible Apron |
The step-by-step directions on the tutorial are excellent; this would be a great project for even a beginning sewer. I'll add a few comments/tweaks/suggestions that may be helpful.
- The pattern calls for two pieces of coordinating fabric, each measuring at least 23” (length) x 20”(width). Because I was working with what I had, I used five different fabrics, each measuring 12" x 44" (1/3 yard from five different 44" bolts), and split the front and back into two different panels.
- The pattern only includes one pocket. To make it 100% reversible, I included two. I did not, however, make the pattern out of two different fabrics (as shown above). I did decide to split the one big pocket into two pockets; since I already had a seam running down the middle and because the entire apron is topstitched, it worked visually, and I think the two pockets are a little less floppy than one big pocket would be.
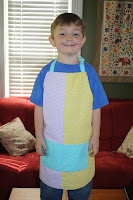
- I used two fabrics (purple and yellow) for the front panel, two fabrics (green and pink) for the back panel, and blue for all four straps and the two pockets.
- So as to work with what I have, my straps were only cut to 3" instead of 4". This makes the final straps a bit narrower than shown above. Buy a half yard of the strap/pocket fabric if you want wider straps.
- Calling all Grandmas: this would be a REALLY fun project to make for a kid with a kid - take them to the fabric store, let them pick out their five fabrics, and throw it together. I plan on doing that with Finn sometime soon.
- Note that the pattern also includes adult dimensions. I shall be treating myself to an apron sometime soon, too.
- I put this together, start to finish, during one naptime. Love. The only notion I had to buy were the two D clips. I bought the 3/4 " size (since my straps were narrower) which cost about $2.50. The fabric (according to the 2007 receipt I found in the bag) cost around $12.
- Here is Finn dutifully modeling Claire's apron. They look like twins, so just imagine long curly red hair and you'll get the idea.
Now go print the tutorial! And have fun!


Calling all Grandmas...??? Does this work for a Grandma who "sews" with a glue-gun?
ReplyDeleteOh oh oh!! I love this! Not that I'd ever actually try sewing something...Anna has two aprons already (I know, completely indulgent on my part), but neither of them are handmade by me.
ReplyDeleteAlso..."five years ago when I was pregnant with Finn"...what the?!? Five years? That's just crazy. Time flies when we're loving our babies. :-)