Showing posts with label sewing. Show all posts

Wednesday, June 13, 2012

Applique Fever

5:09 PM 0 Comments
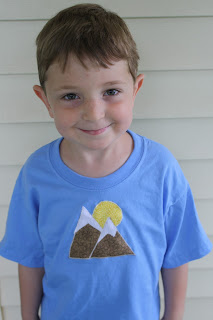
Monday's little adventure in making tote bags got me all excited about applique. Bet that isn't a sentence you read every day. Anyway, I've been wanting to make shirts for my kids for a while, so after I finished the bags, I whipped up a shirt for Finn. I kind of really love it:


Here's how I did it:

1 - Buy t-shirt. T-shirts were $2.50 at the craft store this week, so I grabbed a few. Prewash.

2 - Gather materials: shirt, thread, sewing machine, scraps of fabric, fusible interfacing, scissors

3 - I used the same method described in my last post - fusing interfacing to the back of the fabric before cutting out the shapes. This gives the design a lot more heft and also makes it easier to work with when it is on the machine.


4 - You can do whatever you want for patterns. I free-handed the mountain design. For others, I did Google Image searches until I found what I needed. I found that coloring pages were a good resource as they provide blocky interpretations of images.


5 - Cut out the different components of the design from your fabric scraps (that already have interfacing fused on the back), then lay out the pieces on the shirt and pin everything into place.


6 - Sew all raw edges with a zigzag stitch. Mine was set at 2.5 width, .5 length. Practice on a scrap to make sure it is the size you want it.


7 - Trim all loose threads then dress your kid!
Monday, June 11, 2012

Road Trip Ready

2:58 PM 0 Comments
Question: How do you prepare a two-year-old and a four-and-a-half-year-old for a twenty-six hour road trip across five states?

Answer: I have no idea. But I thought I'd start with tote bags.


We've made this trip before, last year in fact - we packed up the minivan and strapped in the boys to make the cross country trek from central Illinois to western Montana. It was different last year, somehow. For one, Emmett was still very much a baby - in a rear facing car seat with a propensity to sleep a lot and in that blissfully unaware stage (you know, where you could pull into a drive-in and order yourself a milkshake without your kid even noticing) that made him kind of a non-factor in the equation. Finn stayed content with books and DVDs and more sleep than usual. Now I've got  two kids to keep entertained, two kids who aren't particularly good at entertaining themselves in the best of situations. I am thus determined to be prepared.

Over the last few weeks, I've been building a stash of goodies for the trip. I'm not talking about the edible kind (though we will bring plenty of those), but the keep-'em-happy kind. I've been searching the Internet for parenting articles about road trip happiness (and have found a lot more directed at older kids, unfortunately), and I've talked to Finn at length about the kinds of things he wants to do in the car.

We will bring the portable DVD player, but I honestly don't want them watching movies the entire time. I did think ahead to purchase new, sturdy, kid-sized headphones (aren't they cute?) for both boys, since last summer Finn watched (and we listened to) It's a Very Muppet Christmas (the really annoying one with Joan Cusack) about seventeen times in South Dakota alone.

I love the Crayola Color Explosion markers that only show up on special paper (instead of all over my kids), so both boys got a set of those. We've got coloring books and colored pencils and pads of paper for drawing. Each boy gets a set of binoculars and a flashlight, and we picked up some garage sale books last week so they each have some books they've never seen before.Finn's got a stash of Highlights Hidden Pictures magazines to bring along, and Emmett will probably get a few little cars to play with.

Last year, Finn developed a deep affection for travel brochures. He actually slept with a stack next to his pillow the whole time we were at Grama and Grampa's house. That stash migrated to every deep corner of the van. This year, I made him a brochure box that he can use to stash the brochures he picks up. Hopefully this will work for both of us.


Now that I've got this ever growing pile of activities, where do I put it all? I thought a couple of tote bags might do the trick and decided to make them extra special by customizing them. Here's a quick tutorial on how I did that for your appliqueing pleasure (I can't believe spell check let me get away with that).

I would love to hear any great road trip ideas you might have, particularly for the preschool/toddler set.

Happy trails, all!


 Initial Tote Bags

What you need: blank canvas tote bag,initial pattern, scrap of fusible interfacing, iron, scrap of fabric, sewing machine, thread

1 - Start by pressing the tote bag and the fabric scrap so that everything is nice and smooth.

2- Using a word processing program, print out the desired letter. Mine were Franklin Gothic Heavy, size 700 in outline.
 
3 - Cut the fabric and the interfacing slightly larger than the letter. Use an iron to fuse the interfacing to the back side of the fabric. This makes the initial substantially sturdier. Pin the letter to the right side of the fabric/interfacing and cut it out.

4 - Pin the letter where you want it on the bag. Use a zigzag stitch to attach the letter to the bag (it helps to practice on a scrap of fabric first so that you get the zigzag to the appropriate width and length - mine was 2.5 wide and .5 in length).


5 - Carefully sew all sides of the letter. Note: curves are trickier than straight lines. Just take your time.

 
6 - Trim off loose threads. Enjoy your bag!


Sunday, May 20, 2012

An Apron for Claire

10:43 AM 2 Comments
Remember my earlier reference about buying all the material for a quilt and then never getting around to making it? Case in point: Five years ago, I planned a baby quilt for my brand new niece Claire. I was eight months pregnant myself at the time and foolishly thought I'd get it done before Finn entered my life. It didn't happen, and the years passed. I ended up making Claire a quilt for her third birthday, so I'm clear of my Auntie Hopie commitment, but I used different fabric. The originally purchased material has been sitting in a box in my basement waiting for just the right moment.

I remembered that stockpile of fabric a few weeks ago when I was thinking about Claire's upcoming fifth birthday. I thought perhaps I could make her an apron, and the World Wide Web, in a moment of grace, gave me exactly what I was looking for. I am so ridiculously excited about this project and about this super easy, super user-friendly tutorial at Stardust Shoes

Classic Reversible Apron

The step-by-step directions on the tutorial are excellent; this would be a great project for even a beginning sewer. I'll add a few comments/tweaks/suggestions that may be helpful.
  • The pattern calls for two pieces of coordinating fabric, each measuring at least 23” (length) x 20”(width). Because I was working with what I had, I used five different fabrics, each measuring 12" x 44" (1/3 yard from five different 44" bolts), and split the front and back into two different panels.
  • The pattern only includes one pocket. To make it 100% reversible, I included two. I did not, however, make the pattern out of two different fabrics (as shown above).  I did decide to split the one big pocket into two pockets; since I already had a seam running down the middle and because the entire apron is topstitched, it worked visually, and I think the two pockets are a little less floppy than one big pocket would be.

  • I used two fabrics (purple and yellow) for the front panel, two fabrics (green and pink) for the back panel, and blue for all four straps and the two pockets.

  • So as to work with what I have, my straps were only cut to 3" instead of 4". This makes the final straps a bit narrower than shown above. Buy a half yard of the strap/pocket fabric if you want wider straps.
  • Calling all Grandmas: this would be a REALLY fun project to make for a kid with a kid - take them to the fabric store, let them pick out their five fabrics, and throw it together. I plan on doing that with Finn sometime soon.
  • Note that the pattern also includes adult dimensions. I shall be treating myself to an apron sometime soon, too.
  • I put this together, start to finish, during one naptime. Love. The only notion I had to buy were the two D clips. I bought the 3/4 " size (since my straps were narrower) which cost about $2.50. The fabric (according to the 2007 receipt I found in the bag) cost around $12. 
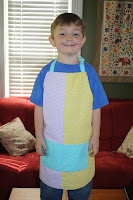
  • Here is Finn dutifully modeling Claire's apron. They look like twins, so just imagine long curly red hair and you'll get the idea.

 Now go print the tutorial! And have fun!

Monday, May 7, 2012

Charlie's Quilt - The Details

3:18 PM 1 Comments
I'm a self-taught quilter, and I'll admit up front that many of my techniques are pretty questionable; I'm sure there are specific ways to do many of the things that I've figured out as I go along, but I don't know them.

That said, I've learned a few tricks over the years and thought I'd share some of that today:

  • I always start my quilts with a scale drawing on graph paper. While I am certain that there are higher tech ways of doing this, I stick with paper and colored pencils.

  • After the drawing, I figure out how much fabric I need based upon the number and size of the blocks (accounting for seam allowances). It's more geometry than anything, and while I sort of enjoy dorking out in this regard, it also can be a bit mentally exhausting. I always err on the side of too much and donate leftover yardage. I love The I.D.E.A. Store for their willingness to take what I don't need.

  • I use a rotary cutter when I can. Sometimes scissors are just easier, though.

  • I recently purchased a great big cardboard sewer's mat. It turns my dining room table into a really big sewing table, and the measuring lines are very handy.  Since I don't have a designated sewing space, I like that I can lay out my quilt then move the board if we need to use the table.

  • As for the actual piecing, I chain piece as often as I can and keep an ironing board at the ready. The piecing is most often done in batches, because I'm generally working with small chunks of time. It is also often done with my trusty pin assistant at the ready.


    • Once I'm pieced and pressed, I buy the batting, backing, and edging. It's a rule of mine, kind of like not purchasing plants until the soil is prepared. Too many times I've purchased everything and not finished the quilt.

    • I machine quilt using a walking foot. I like quilting a bazillion times more since I got a machine that is able to do this. And I really like using quilter's safety pins to hold my layers together. I quilted Charlie's quilt with a basic diamond design in keeping with the baseball theme.


    •  As for finishing details, I almost always use double fold bias tape to finish the edges. It's so user friendly, and by the time I get to that point, I just want to be done.

    And finish I did! It turned out really great, and, as my sister noted in the comments on my previous entry, Charlie loved his "baseball blankie."

    Tuesday, December 13, 2011

    A First for Finn

    12:24 PM 3 Comments
    Yesterday afternoon, while finishing up a sewing project, I found myself with two lengths of polar fleece, about 8 inches wide and 30 inches long. I remembered that Finn had asked me for a scarf and noted that the fleece was just the color to match his coat. The part of me that likes to make things more complicated than they need to be then said, "Oh Hope, you can make him a much nicer knitted scarf." The part of me that is always working to be a better mom said, "But he could make this himself."

    Finn had his parent-teacher conference at preschool last week, and one of the things that we took away from it was the importance of allowing four-year-olds to focus on the process rather than the product. Sean and I are both product people. Many a night Sean starts out playing blocks with the kids and ends up creating the world's greatest block creation while the kids have moved onto something else. Many an evening I deny Finn the opportunity to help with the trickier parts of dinner because I want something just so. We both have a tendency to initiate art projects that have a definitive end product rather than putting out the art supplies and letting him explore.

    "Hey, Finn, how would you like to make yourself a scarf?"

    "Do I get to press the pedal on the sewing machine?"

    "Yup."

    And so, for the next forty-five minutes, Finn made a scarf. I tried to be as hands-off as I could while still ensuring his safety. I may have hovered a bit when he sewed that one seam on the sewing machine, and I did set the machine to its very slowest setting, but he did press the pedal himself -- in a standing position.  I don't usually let him use my fabric scissors, but with close supervision he was able to cut the fringe entirely by himself. And I resisted the urge to go back and clean it up when he was done. It is perfect just the way it is.

    End result: a scarf made with two lengths of fleece with a seam up the middle and fringed ends.


    Bigger result: the proudest four year old I have ever seen. Mama's pretty proud too.


    Sunday, October 30, 2011

    Happy Halloween!

    9:45 PM 1 Comments
    Halloween is a three-day affair for our family this year. It began Saturday evening, when a wonderful group of friends from around the neighborhood gathered on our front lawn then paraded to a nearby neighbor's home for a bonfire, s'mores, and hot chocolate. It continued Sunday evening, when we put the costumes on again and attended a "Trunk or Treat" event. Finally, on Monday evening, we'll get to the original business of ringing doorbells and collecting goodies.

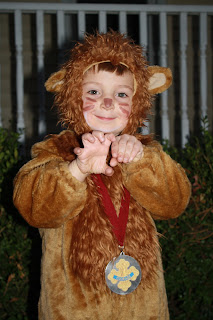
    As you may recall from my previous post on the topic, we had a Wizard of Oz theme going this year. It started innocently enough, with the decision to reuse the scarecrow costume I made for Finn a few years ago. I then made a Dorothy pinafore and picked up some red ballet flats at the local Goodwill for iona. And I got totally lucky on the lion costume, as I had a serendipitous conversation with a mom I know that resulted in her lending us a size 4 cute-as-can-be lion costume for Finn. Here they are in all of their Emerald City glory:


    At the last minute, Sean and I decided to join in the themed fun and dressed as Auntie Em and Uncle Henry:


    Though, as our good friend pointed out, all we needed was a pitchfork and a black suit jacket to pass as the couple from American Gothic:


    I was so pleased with how the costumes turned out. Emmett grew increasingly wary of the scarecrow's headpiece as the night grew late, but he tolerated it nonetheless, and his amateur walker stumbles gave him the appearance of being in perfect character. Finn was absolutely tickled to be the lion, from the whiskers to the big "Courage" medal he wore around his neck. And iona, who is celebrating American Halloween (she is from France) for the first time, was seemingly delighted both with the costume and the sweet treats. Collectively, they looked great and had heaps of fun (even if the boys don't look particularly happy in this picture):


    I should add that The Wizard of Oz has some history in our family. Way back when I was in junior high, my suburban school district put on a production of The Wizard of Oz, and I played the part of Dorothy:


    At dinner on Saturday evening, we started talking about the story, and iona and Finn both informed me that while they have seen the VHS recording of that production countless times at Grandma and Grandpa's house, neither of them have ever seen the real movie! So we'll be hitting the movie section at the library sometime this week to check out the MGM version. Finn will probably be sorely disappointed that I am not in it.

    I hope everyone had a safe and memorable Halloween weekend. I will never stop loving the imagination emphasis of this kid-centered holiday, and I love being able to be a part of that magic for my own kiddos.

    By the way, I am officially project free, having finished my two knitting projects and finished sewing Halloween costumes. I have a stack of knitting books that I checked out from the library last week and a headful of ideas for sewing projects. We'll see where the week takes me.

    Saturday, October 15, 2011

    My Friend Janome

    6:54 PM 0 Comments
    When I was seventeen years old, I decided that I wanted to learn to sew. My mom doesn't sew (though she can work wonders with a glue gun and stitch witchery) and we didn't have a sewing machine in the house. So I borrowed a machine and signed up for an introductory class at the now-defunct Minnesota Fabrics. I ended up making a very ugly but well constructed burgundy prom dress that I didn't wear to prom. I was hooked. I got a sewing machine for my eighteenth birthday which I brought to college the next fall. My college sewing consisted of two main areas: 1) making patchwork dresses, backless smock tops, and split cords to clothe me and my hippie friends and 2) working with professional dressmakers and designers as a staff member in the theater department's costume shop, where I got to learn fun things like how to dye spandex, how to use an overlock machine, and how to work without patterns. Between the two, I sewed a lot. College was followed by two years in the Peace Corps, during which I sewed frequently but slowly as I was using my host mother's hand treadle machine. Things slowed down after that: grad school, then a career, then kids.

    Three years ago, my in-laws got me a brand spanking new Janome machine. It's amazing. It makes buttonholes and has fifty decorative stitches and it's quiet and classy. I love it. I knew right away that I wouldn't have a lot of time to use it, to which my mother-in-law said, "Well, if you don't have a lot of time to sew, you really need a great machine. She was right. My sewing as of the last four years pretty much consisted of making baby quilts for my newest nieces and nephews and...of course...Halloween.  Which brings me to this post.

    When Finn was one year old, I made him a scarecrow costume. I used an official Wizard of Oz pattern and spent way too much time getting it perfectly right. Turned out pretty cute, though.


    Now that Emmett is one, I figured I might as well get one more use out of the costume. The inklings of a theme started brewing in my head. Long story short, while the scarecrow costume is ready to go, I'm now making Finn a cowardly lion costume and Iona (my thirteen year old live-in niece) a Dorothy costume.  I found McCall's patterns on sale for 99 cents and picked up the materials yesterday. Late last night, I pulled out my old friend Janome and threw together a Dorothy costume. And you know what? It was really fun. I diverged from the pattern directions pretty quickly, particularly because the pattern called for a pinafore attached to a blouse and I just wanted to make a pinafore. The skirt turned out poofy, the front of the pinafore lays perfectly, and, most importantly, Iona loves it. I'll get to the lion costume some time this week.

    Making clothes is not something I can do when I have a few minutes, as I don't have a designated space for my machine and sewing supplies. In some ways, that makes the process so much more rewarding, as I designate time for sewing and focus on the project at hand. Sometimes, you just have to do that. 

    Did I mention that my mom is a goddess with a glue gun? Check out my 3rd grade Halloween costume: