Showing posts with label gifts. Show all posts

Wednesday, June 13, 2012

Applique Fever

5:09 PM 0 Comments
Monday's little adventure in making tote bags got me all excited about applique. Bet that isn't a sentence you read every day. Anyway, I've been wanting to make shirts for my kids for a while, so after I finished the bags, I whipped up a shirt for Finn. I kind of really love it:
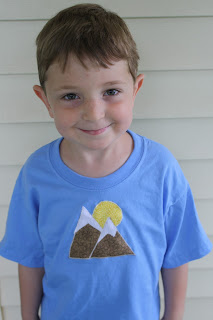

Here's how I did it:

1 - Buy t-shirt. T-shirts were $2.50 at the craft store this week, so I grabbed a few. Prewash.

2 - Gather materials: shirt, thread, sewing machine, scraps of fabric, fusible interfacing, scissors

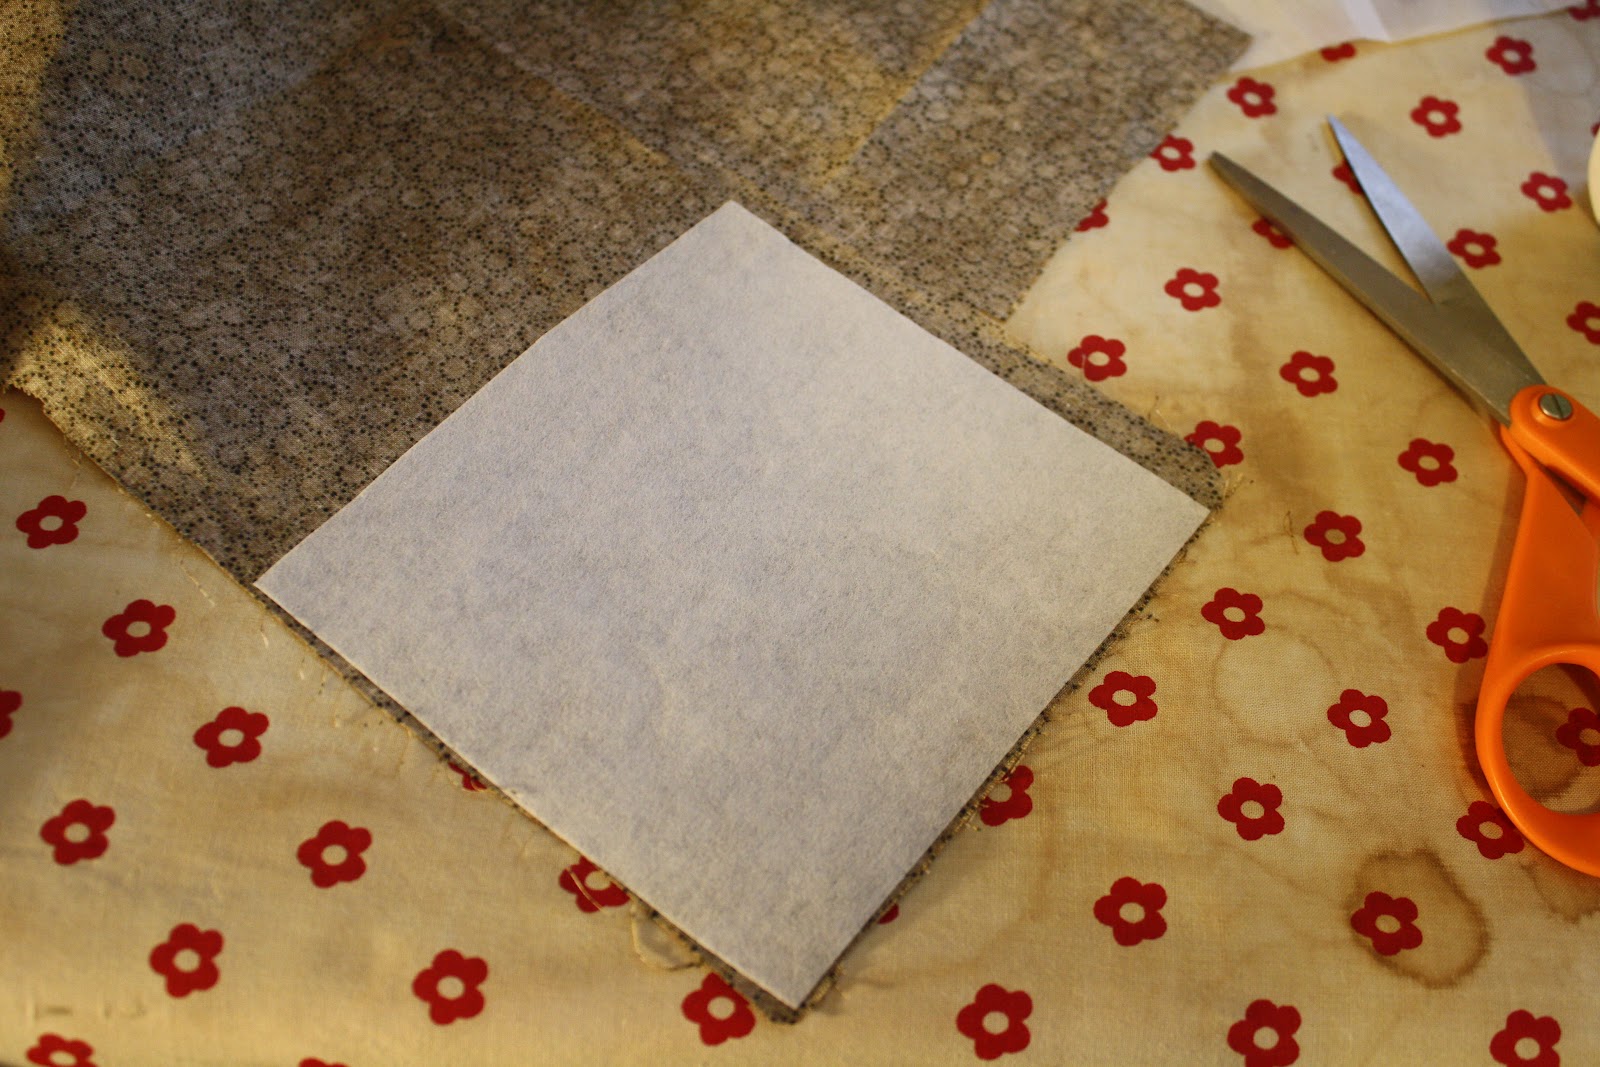
3 - I used the same method described in my last post - fusing interfacing to the back of the fabric before cutting out the shapes. This gives the design a lot more heft and also makes it easier to work with when it is on the machine.


4 - You can do whatever you want for patterns. I free-handed the mountain design. For others, I did Google Image searches until I found what I needed. I found that coloring pages were a good resource as they provide blocky interpretations of images.


5 - Cut out the different components of the design from your fabric scraps (that already have interfacing fused on the back), then lay out the pieces on the shirt and pin everything into place.


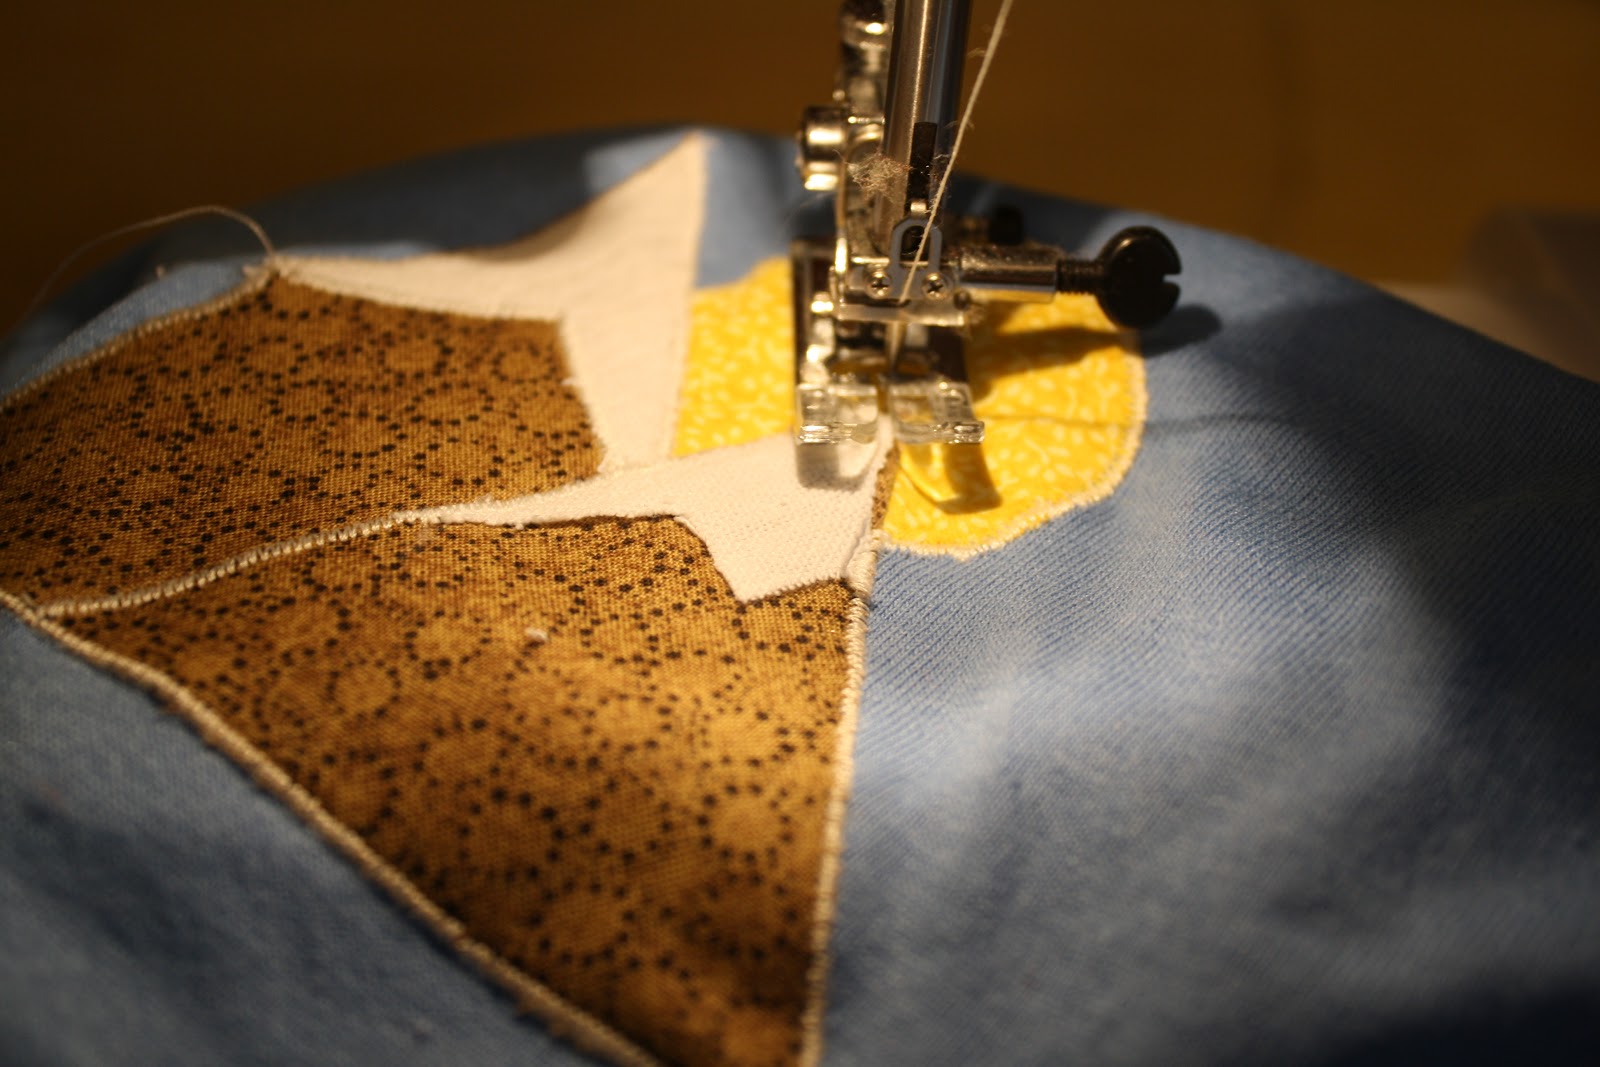
6 - Sew all raw edges with a zigzag stitch. Mine was set at 2.5 width, .5 length. Practice on a scrap to make sure it is the size you want it.


7 - Trim all loose threads then dress your kid!

Sunday, May 20, 2012

An Apron for Claire

10:43 AM 2 Comments
Remember my earlier reference about buying all the material for a quilt and then never getting around to making it? Case in point: Five years ago, I planned a baby quilt for my brand new niece Claire. I was eight months pregnant myself at the time and foolishly thought I'd get it done before Finn entered my life. It didn't happen, and the years passed. I ended up making Claire a quilt for her third birthday, so I'm clear of my Auntie Hopie commitment, but I used different fabric. The originally purchased material has been sitting in a box in my basement waiting for just the right moment.

I remembered that stockpile of fabric a few weeks ago when I was thinking about Claire's upcoming fifth birthday. I thought perhaps I could make her an apron, and the World Wide Web, in a moment of grace, gave me exactly what I was looking for. I am so ridiculously excited about this project and about this super easy, super user-friendly tutorial at Stardust Shoes. 

Classic Reversible Apron

The step-by-step directions on the tutorial are excellent; this would be a great project for even a beginning sewer. I'll add a few comments/tweaks/suggestions that may be helpful.
  • The pattern calls for two pieces of coordinating fabric, each measuring at least 23” (length) x 20”(width). Because I was working with what I had, I used five different fabrics, each measuring 12" x 44" (1/3 yard from five different 44" bolts), and split the front and back into two different panels.
  • The pattern only includes one pocket. To make it 100% reversible, I included two. I did not, however, make the pattern out of two different fabrics (as shown above).  I did decide to split the one big pocket into two pockets; since I already had a seam running down the middle and because the entire apron is topstitched, it worked visually, and I think the two pockets are a little less floppy than one big pocket would be.

  • I used two fabrics (purple and yellow) for the front panel, two fabrics (green and pink) for the back panel, and blue for all four straps and the two pockets.

  • So as to work with what I have, my straps were only cut to 3" instead of 4". This makes the final straps a bit narrower than shown above. Buy a half yard of the strap/pocket fabric if you want wider straps.
  • Calling all Grandmas: this would be a REALLY fun project to make for a kid with a kid - take them to the fabric store, let them pick out their five fabrics, and throw it together. I plan on doing that with Finn sometime soon.
  • Note that the pattern also includes adult dimensions. I shall be treating myself to an apron sometime soon, too.
  • I put this together, start to finish, during one naptime. Love. The only notion I had to buy were the two D clips. I bought the 3/4 " size (since my straps were narrower) which cost about $2.50. The fabric (according to the 2007 receipt I found in the bag) cost around $12. 
  • Here is Finn dutifully modeling Claire's apron. They look like twins, so just imagine long curly red hair and you'll get the idea.

 Now go print the tutorial! And have fun!

Monday, May 7, 2012

Charlie's Quilt - The Details

3:18 PM 1 Comments
I'm a self-taught quilter, and I'll admit up front that many of my techniques are pretty questionable; I'm sure there are specific ways to do many of the things that I've figured out as I go along, but I don't know them.

That said, I've learned a few tricks over the years and thought I'd share some of that today:

  • I always start my quilts with a scale drawing on graph paper. While I am certain that there are higher tech ways of doing this, I stick with paper and colored pencils.

  • After the drawing, I figure out how much fabric I need based upon the number and size of the blocks (accounting for seam allowances). It's more geometry than anything, and while I sort of enjoy dorking out in this regard, it also can be a bit mentally exhausting. I always err on the side of too much and donate leftover yardage. I love The I.D.E.A. Store for their willingness to take what I don't need.

  • I use a rotary cutter when I can. Sometimes scissors are just easier, though.

  • I recently purchased a great big cardboard sewer's mat. It turns my dining room table into a really big sewing table, and the measuring lines are very handy.  Since I don't have a designated sewing space, I like that I can lay out my quilt then move the board if we need to use the table.

  • As for the actual piecing, I chain piece as often as I can and keep an ironing board at the ready. The piecing is most often done in batches, because I'm generally working with small chunks of time. It is also often done with my trusty pin assistant at the ready.


    • Once I'm pieced and pressed, I buy the batting, backing, and edging. It's a rule of mine, kind of like not purchasing plants until the soil is prepared. Too many times I've purchased everything and not finished the quilt.

    • I machine quilt using a walking foot. I like quilting a bazillion times more since I got a machine that is able to do this. And I really like using quilter's safety pins to hold my layers together. I quilted Charlie's quilt with a basic diamond design in keeping with the baseball theme.


    •  As for finishing details, I almost always use double fold bias tape to finish the edges. It's so user friendly, and by the time I get to that point, I just want to be done.

    And finish I did! It turned out really great, and, as my sister noted in the comments on my previous entry, Charlie loved his "baseball blankie."

    "Hey, I have an idea for your blog."

    10:32 AM 2 Comments
    So says my sister Sarah shortly after I started this blog last fall.  She then teasingly reminded me that I still hadn't finished the baby quilt promised to her youngest child, Charlie, over a year and a half ago and suggested that I write a blog entry about finishing that. She was just giving me a hard time, but it was in fact a good kick in the pants for me to go back to that long-forgotten project and get stitching.

     Okay, maybe it wasn't quite enough of a kick. That was in October. I finished about half the piecing in January. I finished the rest of it last week...the last week of April. But the point is that I got to it, right?

    I have three sisters and among them they have eight children.  With the exception of Charlie, I have made a baby quilt for every single one of them.  I made the first one back in the summer of 1998 and the second one that fall. I made one entirely by hand in Mongolia and one when I was living in Missoula. I have made three more since moving to Illinois. None of my sisters are planning on having more kids, so Charlie's will be the last of the Auntie Hopie quilts.

    For Gracie - 2008


    For Iona - 1998

    For Claire - 2010

    For Didi (and with Didi!) - 2002

    I should add that I have started Charlie's quilt three times. The original plan was to attempt to match the quilt to the colors in his nursery, but that didn't quite work so I abandoned the effort. The next plan was to do something with a nautical theme, an effort to appease Charlie's dad, but I didn't make it very far with that design. In my third effort, I decided to go with Charlie's interests - at eighteen months, his favorite word was "baseball."  Not surprising, as he lives in a pretty hard core baseball family. I'm a baseball fan myself, and I loved this idea, particularly because I love the way he says "baseball" in his little voice.

    Quilting is a far bigger time commitment than knitting, particularly because I cannot multitask nearly as well with a quilting project. There are parts of the quilting process that I absolutely love, namely the planning. I love conceptualizing an idea and shopping for the fabrics. I despise cutting out the pieces but don't mind putting them together. I really don't care for the actual quilting. But I sure love finishing a quilt and presenting it to someone I love.

    So stay posted...I'll be back soon with details on the process and pictures of the finished quilt!

    Tuesday, April 24, 2012

    Dinner Tonight: Cornbread on the Side

    8:59 PM 0 Comments
    So for years I have wanted a set of soup and sandwich platters from Uncommon Goods; since I came across these lovely sets four or five years ago, they have had a permanent place on my wishlist.  Aren't they neat?


    Besides the obvious soup and sandwich combination (which is usually featured at least once a week for dinner around here), they are perfect for soup and bread, or cereal and toast, or fruit and a muffin, or soup and a salad...just think of all the things that can go together!

    Long story short - Sean got me a set for my birthday, and I am ridiculously excited about them. They made tonight's dinner (which was essentially reheated chili that I found in the back of the freezer accompanied by big slabs of corn bread) so much nicer, and I foresee extensive use in our future.

    In addition to bragging about my new favorite product, I thought I'd share a quick corn bread recipe with you all. I posted this several months ago, but it is worth posting again. Why, you may ask?

    • Making cornbread from scratch (rather than from a mix) takes maybe two or three minutes more. Seriously. The first step is to mix all the dry ingredients. When you buy a mix, that is the only part that is done for you. But chances are the dry ingredients in your cupboard are fresher than those in a boxed mix, and I'm pretty sure this recipe uses more baking powder than the average boxed mix.
    • Making cornbread from scratch yields the fluffiest, lightest cornbread I have ever tasted. See above re: baking powder.
    • Homemade cornbread does not crumble into a million pieces when you cut it. It stays in nice wedges that are, coincidentally, perfect for putting on the square part of a brand new soup and sandwich platter.

    This is the recipe on the canister of Quaker Yellow Corn Meal. Nothing fancy, but oh so good!

    Easy Corn Bread

    1 1/4 cups flour
    3/4 cup corn meal
    1/4 cup sugar
    2 tsp. baking powder
    1/2 tsp. salt
    1 cup milk
    1/4 cup vegetable oil
    2 egg whites or one egg, beaten

    Heat oven to 400 degrees. Grease 8 or 9 inch pan.

    Combine first five ingredients.

    Stir in milk, oil, and egg, mixing just until dry ingredients are moistened.

    Pour batter into prepared pan.

    Bake 20 to 25 minutes or until light golden brown. Serve warm.


    Tuesday, February 14, 2012

    Wood + Photography = Love

    3:48 PM 3 Comments
    I've rediscovered my love of Pinterest in the last few weeks. It supplied me with my Valentine's Day breakfast treat for my boys. It's where I found the idea for the paint chip bookmarks I wrote about earlier. And it lead me to this ridiculously cool tutorial on how to use a block of wood and a printout of a photograph to make a really awesome present for my husband:


    A few additional tips garnered in the process:

    • I didn't know what gel medium was. I found it at Michael's in the aisle with the artist supplies (not the craft paints but the oils/acrylics/etc.)
    • When rubbing off the paper, don't rub too hard. I made that mistake in my first attempt and my husband ended up losing his face. I used a gentler hand the second time. Fortunately the block of wood has two sides.
    • My favorite part of the video is where she has a baby sitting on her lap as she attempts to finish the project. Not really a tip, but thank you, unnamed super cool wood photography lady, for that dose of reality in your web tutorial.
    And that is about all I have to say. This was a fun, easy, results-oriented project that I will be repeating many many times in the future. Here's the finished result. It looks kind of washed out since the flash reflected on the mod podge, but you get the idea. It's an old photo of Sean and me, but one of my favorites:


    Tuesday, January 10, 2012

    On the Needles: Slipper Socks

    10:19 PM 2 Comments
    I first started knitting when I was studying abroad in college. A friend had showed me the basics the year before, and for some reason I picked up needles and yarn somewhere in northern India during that long ago semester. I particularly remember knitting during the independent study portion of the program, at which time the forty or so of us studying together all branched out to different places throughout India and Nepal to do a field-based research project. I was in Darjeeling, high in the tea-covered mountains, and boy, was it cold. Maybe that is why I started knitting, now that I think about it. Anyway, I had a lot of time to myself, and I knit my first scarf. I remember bringing it down to the Tibetan woman who worked at the front desk of the guest house where I had been staying for several weeks and somehow explaining to her, without words, that I had no idea how to cast off. She, without words, taught me. I've been knitting ever since.

    Like any knitter, I love me a good yarn shop. I love fancy yarns and unusual fibers and hand dyed wools. I have a gigantic stash of yarn that I just had to have, with no particular project in mind, and I love going to new yarn stores when I visit new places.

    Some of my favorite projects, however, come from your average balls of yarn that I buy at Michael's or Jo-Ann's and from patterns that I download for free from Lion Brand. As I've previously mentioned, I'm not the fastest knitter. That said, I love projects that use thick yarn, and I particularly like the Lion Brand Thick and Quick. Over the last few years, I have made probably a dozen of these hats: they stitch up beautifully, are very warm, are flexible for sizing (which helps, since I'm typically mailing them to the receiver), and look adorable. As an added bonus, I can usually finish one in the time it takes to sit down and watch a movie.


    Last week, I got an email from Lion Brand with a link to a pattern for socks made with Thick and Quick yarn.  Interestingly enough, I learned to knit socks from a Mongolian friend entirely in Mongolian and to this day the only "pattern" I've ever used are the notes I scratched down during our demonstration-based lessons ten years ago. So I think I'm going to give this a try. The floors in my house are always cold, so I'm happy to have a pair of thick warm slipper socks in my near future. I'll let you know how it goes! 

    Lion Brand Longford Hat

    Lion Brand Slipper Socks


    Tuesday, December 20, 2011

    Salt Dough Ornaments - Part II

    8:20 AM 1 Comments
    Things I've learned about making salt dough ornaments since my last post:
    1. Despite the fact that we got the idea to make salt dough ornaments from a dated craft book, it turns out that salt dough ornaments are far from forgotten; they turned up on several  blogs I follow this month, from The Artful Parent to TinkerLab to Paint Cut Paste (gluten free, no less!). So I'm not nearly as vintage chic as I had thought, as there are lots of folks out there having fun with salt dough right now. I am honored to share the company, and these ladies have lots of awesome and unique decorating ideas.

    2. Figuring out how to finish the ornaments proved more of an ordeal than I had anticipated. The recipe I consulted suggested using "shellac."  When I went to Michael's, I wasn't able to find shellac or to find anyone who could tell me where to find shellac. I found myself in the adhesives aisle for a while, in the paint aisle for a while, in the miscellaneous things that spray aisle for a while...nothing seemed quite right. I started exploring other blogs for ideas, and I still wasn't able to come up with anything definitive. The next day, I went to the hardware store, and there I found shellac. It was expensive ($15 for a small can), and I had to buy a lot more than I needed. I do like the shiny finish that it gave the ornaments, however (even if it made for bad photos, as the flash reflected in the shininess). One thing I did notice is that it needed to be painted on very thinly, particularly over white sections so as not to give it a yellowish tint.

    3. My biggest mistake was that I used a Sharpie to add customization to the ornaments before shellacking them. Despite the fact that Sharpies are permanent and that I wrote on the ornaments the day before I shellacked them, they still smeared. Grrrrr.  Fortunately, I noticed it right away. I was able to work with it by kind of lightly dabbing the areas with writing then painting all around them. Next time, I'll shellac them first then write on them with a Sharpie. It wasn't a disaster, but it did make the ornaments noticeably less impressive.

    4. A lot of the other bloggers that wrote about salt dough ornaments talked about how happily their kids painted the ornaments. My kid enjoyed making the ornaments for his friends and painting a few others, but he got bored pretty quickly. In part, I think that if we had been working in a place where it was okay to paint with reckless abandon, he may have had more fun; I opted to use acrylic paints, and they look great, but because they stain fabric, we had to be extra careful. This would be a great project for outside; in these parts, we don't generally do Christmas crafts outdoors, however. As noted in my previous post, I might experiment with paint markers next time. I also really like the look of stamping the ornaments. 

    5. In the end, we had close to three dozen ornaments, some painted by Finn, some by Iona, and some by me. We put a few on the tree, a lot on presents, and sent a few back to France with Iona. And we will definitely be making more salt dough ornaments in the future (particularly since I still have a lump of dough in the freezer...). 
    Just shellacked
    For Finn's preschool pals
    Initials in the tree
    Gingerbread boy
    Finn's heart
    Ho Ho Ho piano


                          Monday, December 19, 2011

                          Salt Dough Ornaments - Part I

                          1:12 PM 1 Comments
                          We decided not to take our pajamas off today. Partly because the boys are wearing matching red snowman pajamas that are just too cute to change out of, and partly because our car is in the shop and so I knew we weren't going anywhere. Whatever the reason, it's fun to have a pajama day every once in a while.

                          Staying in days often breed surprises, as was the case this morning. Finn came across a recently acquired book on the shelf: Arts & Crafts from Things Around the House. Sean brought it home from work not too long ago; I think it was a cast-off from a classroom book collection. It reminds me of the craft books I used to check out from my elementary school library, and, given the 1983 publication date, it may in fact be something I read back then:


                          The first project that Finn selected involved collecting pine branches, splashing them with white tempera paint, adding drops of glue then sprinkling them with glitter. I managed to talk him out of that one. Then he picked out a project called "Make and Bake Play Dough."  Perfect.

                          The dough requires flour, water, and a lot of salt. We had everything on hand that we needed (except the shellac, which we will do later). I pulled out a handful of cookie cutters and we were on our way.

                          NOTE: This makes a ridiculous amount of play dough. I filled two big cookie sheets with ornaments and still froze enough to make at least one more batch (I should add that I'm not sure you can freeze salt dough, but I though it was worth a shot). You may want to halve the recipe if you don't need a bajillion ornaments.

                          Make and Bake Play Dough
                          • Mix 2 cups salt, 5 cups flour, and 2 cups warm water. I put it in my stand mixer with a dough hook attachment.  Add additional water as needed to make the dough easy to handle.
                          • Knead until smooth.
                          • Roll out with a rolling pin on waxed paper to a 1/2 inch thickness.
                          • Use a knife or cookie cutter to cut the dough to desired shapes. Transfer to a cookie sheet. If you want to hang your creations, poke a hole at the top (a straw works really well for this).
                          • Bake at 300 for a hour (I baked mine a little longer - they still seemed soft after an hour). When they are cool, paint and coat with a clear shellac.
                          Making the dough was fun. Rolling out the dough was fun. Cutting out the shapes was fun. But painting was by far the most fun. We decided early on to make some presents, and Finn had a good time planning different designs for different people. He made a little ornament for each of the kids in his preschool class, and I made a bunch to add as gift toppers.We used acrylic craft paint; the only downside of this is that it stains fabric, so I was a bit manic about Finn's use of it. I might try paint markers in the future until he is a little older.

                          The ornaments I liked the best were the ones I painted to read "HO HO HO."  I plan on stringing them onto a garland and hanging them in the kitchen. I made the letters by pressing refrigerator magnets into the soft dough, then painting over the indentations.  I originally was going to do "JOY" until I realized that I needed to use letters that worked in mirror image. "HO HO HO" was the perfect solution :)

                          We're not done with this project yet - it'll take a few days to see it through to completion. But here are a few pics of our progress so far.

                          Tuesday, November 15, 2011

                          My Favoritest Product Ever

                          10:44 PM 2 Comments
                          Earlier today I was thinking about the facebook phenomenon and how it has transformed marketing, as suddenly there is a venue for friends to publicly announce their devotion to products/places/things/businesses at absolutely no cost to the products/places/things/businesses themselves.  And I was thinking how interesting it would be to me if everyone shared their one all-time favorite thing. I'm not talking about the raindrops on roses variety (why is that considered a Christmas song, anyway?) nor am I thinking of big ticket items...rather, I'm interested in that one product that in some small way makes your life a teeny tiny bit happier. 

                          Here's mine.

                          The Thermos Nissan 12-ounce Stainless Steel Tumbler, available at amazon.com.

                          In the last decade, I think Sean and I have each owned two or three of these. We've given them as gifts. We've raved about them to friends. We have carried them up mountains and across national borders. This is simply a wonderful travel mug. Here's why:
                          • It's stainless steel, so it doesn't make your coffee taste like plastic.
                          • It's skinny enough to fit in the cup holder of your car.
                          • It's short enough to stand in the cup holder of your car without tipping over.
                          • It can take a tumble and not break. It may dent, but it won't break.
                          • But most importantly...it comes with a screw-on lid that seals SO TIGHTLY that you can pour your coffee early in the morning and still drink piping hot coffee up through lunchtime. And it is truly leak-proof - toss it in your computer bag, in your purse, shake it wildly up and down...no leaks.
                          I seriously love this mug. 

                          In the interest of full disclosure, the mug does have one downside, which is its capacity.  It claims to be a 12 ounce mug, but it actually holds a little more than 10. I deeply wish it were just a little bigger.

                          One other detail I did not mention is that the mug comes with a tea infuser. This doesn't matter to me at all as I don't drink tea, so I simply do not insert the infuser (I recently found four or five tea infusers in the back of a kitchen drawer). If you do drink loose tea, however, I think this would be a nice perk (and the tea drinkers that posted reviews on Amazon had great things to say).

                          So there you have it. My favoritest product ever.

                          So what's yours???

                          Thursday, November 10, 2011

                          On the Needles: Iona Needed a Hat

                          4:10 PM 2 Comments
                          This fall, Sean and I have had the joy of hosting our oldest niece, Iona, in our home. Iona is from Strasbourg, France, where she has lived all of her thirteen years. This semester, Iona is living here as an exchange student,  attending an American middle school and having all kinds of American middle school fun. We have loved having her here and are already sad to think about her leaving just before Christmas.

                          When you are used to having two little boys, it's a big change to suddenly have a teenaged girl in the house. Someone to watch Glee with me! Someone who loves going grocery shopping with me! Someone who wants to find broadway soundtracks at the library with me! Imagine my delight when, a few weeks ago, she mentioned to me, "Auntie Hopie, I need a winter hat. Do you think you could make me one?"

                          This is by no means the first thing I've knit for Iona. I've got eight nieces and nephews in my family and three more nieces in Sean's, so over the years I've made all kinds of hats/scarves/mittens/sweaters/booties/etc. for the lot of them. I've even got little customized labels that say "Hand Knit by Auntie Hopie." The first piece I remember knitting for Iona was a yellow and red sweater vest with her name across the front that I made while living in Mongolia; she was three at the time:

                          Iona and Me, Christmas 2001

                          As far as I can recall, this is the first project I've knit where the recipient was privy to the pending gift. I let her pick the yarn from the stash, and she checked in on the progress frequently.


                          The pattern is The Rosa Hat from the amazing Amanda Blake Soule. As written the pattern calls for wool, but as Iona is sensitive to wool, I went with a super soft acrylic instead. Honestly, I'm not positive what it is as I didn't have the label with the ball of yarn, but it's fuzzy and pink and it is what she wanted. I absolutely loved this pattern and will make it many more times in the future. It's knit on small needles so it's very warm, and the miniature cabling pattern on the rim adds a lot of visual interest:


                          I finished the hat last night, and my pink-loving temporary daughter is ready to face the dark days of winter. She looks adorable, and I can rest knowing she will be warm on the walk to school. No one told me how hard it was to convince a teenager to dress appropriately for the weather!


                          Monday, October 24, 2011

                          On the Needles: Felted Yoga Mat....DONE!

                          2:27 PM 11 Comments
                          A lapful of knitting

                          It was a blissful October afternoon. A sprinkling of clouds, abundant sunshine, and a breeze that subtly shifted from a little cool to a little warm throughout the day. And for two incredible hours, Emmett napped, Finn tossed a football around the backyard (supported by my whoops and hollers), and I sat on the back porch watching Finn and working on the yoga mat bag. None too soon, as we were scheduled to stop by Patty's house to say goodbye that evening, and I was determined to have the mat done to give to her. The last minute magic worked, as my children were happy, my fingers nimble, and, by dinner time, the bag was complete.

                          As mentioned in my previous post on the topic, this pattern comes from Joelle Hoverson's book Last Minute Knitted Gifts.  The finished length of the project was 48".  I had no idea how long it would take to get to 48", even using size 10 1/2 needles, and I've been slowly working on this project all summer and into the fall. The pattern is essentially a great big bag with a big wide strap and, when finished, it looks like it would hold a yoga mat for an ogre.

                          Finn and 48" of unfelted yoga mat bag

                          I loved this project because I didn't have to pay a whole lot of attention to what I was doing; after deciding what colors I was going to use, I could change the yarn whenever I felt (ha!) like it. I wanted playful, sunny colors and was able to find exactly what I needed in my yarn stash.

                          Pre-felting
                          Post-felting


                          I felted the bag in my front-loading washing machine; it took about twenty-five minutes total and I checked it every five minutes. Once complete, it was the perfect size for a yoga mat.


                          It makes me so happy to think of this mat accompanying Patty on her journey west. She loved it, even if it was still a little damp...hopefully it'll dry out by the time she gets there!