Showing posts with label cookbooks. Show all posts

Tuesday, June 12, 2012

Homemade English Muffins

8:01 AM 0 Comments
I read cookbooks the way some people read novels, and I've got a new favorite. I love it so much, in fact, that I won't let the library have it back until I absolutely have to. Marion Cunningham (who is a real person, not the mother from Happy Days...) is best known for her work on The Fannie Farmer Cookbook. Back in 1987, she also wrote a book called The Breakfast Book and I simply can't get enough of it. This is not a brunch book - "brunch," she writes in her introduction, "with its undefined ingredients and preparations, is entirely different from breakfast." Nope, this is a cookbook for breakfast (or, as is often the case in our house, breakfast-for-dinner) and includes 288 recipes for all things morning with an emphasis on grains. In addition to the recipes, there is extensive narrative and explanation which, in my opinion, is what makes a cookbook both fun and functional. There are also recipes for such odd-sounding items as baps, bannock, scrapple and rusk, so you really can't go wrong.

I've cooked a few things out of this in the last month or so. One of the first things I tried was a recipe that grabbed me both for its uniqueness and its simplicity -- homemade English muffins. Unique in that they are a yeast-based dough that you do not bake. Simple in that they only require 8 ingredients but yield something far greater than the sum of the parts. This is not your average grocery store muffin - these were fluffy and soft and absolutely delicious.

To make English muffins, you need rings. I picked up a set at the kitchen store for about $6. Alternately, you can use tuna cans with both ends removed.


After the first rising, the muffins are cut out from the dough and left to rise on a cornmeal-sprinkled cookie sheet.


They are then cooked in a skillet back inside the rings. I was crazy nervous about placing metal rings in my nonstick skillet as I am kind of nuts about taking care of these. The rings don't really move at all, though, so it wasn't a problem as long as I was careful. You can only cook as many muffins as you have rings at a time, so account for this in your timing. I ended up making 8 then freezing 8 in their pre-griddled format - they defrosted beautifully another day.


The rings also came in handy for making circle-shaped eggs for breakfast sandwiches. And what divine breakfast sandwiches they were...


Enjoy!

English Muffins
Adapted from The Breakfast Book
Yield: 16 muffins

PRINT ME!

1/2 cup warm water
1 package yeast
1 1/2 tsp. salt
1 tbsp. sugar
1 cup milk, warmed
3 1/2 cups flour
3 tbsp. oil
1/2 cup cornmeal

Pour the water into a  large bowl, sprinkle the yeast over, and stir.  Let stand for 5 minutes to dissolve. Stir in the salt, sugar, warm milk, 2 cups flour, and the oil. Stir briskly with a spoon for a minute to mix well. Add the remaining flour and stir to blend smoothly.  This dough will be very soft. Cover and let the dough double in bulk - about an hour.

Flour a board and your hands. Put the dough on the board, and add a little flour if it is too sticky to manage. Knead the dough three or four times. Pat and push the dough out so it is about 1/4 inch thick. Using a 3 inch ring as a cutter, cut the dough out and place the muffins 1 inch apart on a baking sheet that has been sprinkled with cornmeal. When the muffins are all cut, cover them lightly with a towel and let them rest for 30 minutes.

Heat a griddle until medium hot and spray with cooking spray. Spray the inside of the rings and place on the griddle. Put the muffins in the rings and cook for about 10 minutes on one side and 5 minutes on the other. Watch closely and lower heat as needed.

Before serving, split the muffins in half with a fork and toast. Butter generously and serve warm.

Friday, April 20, 2012

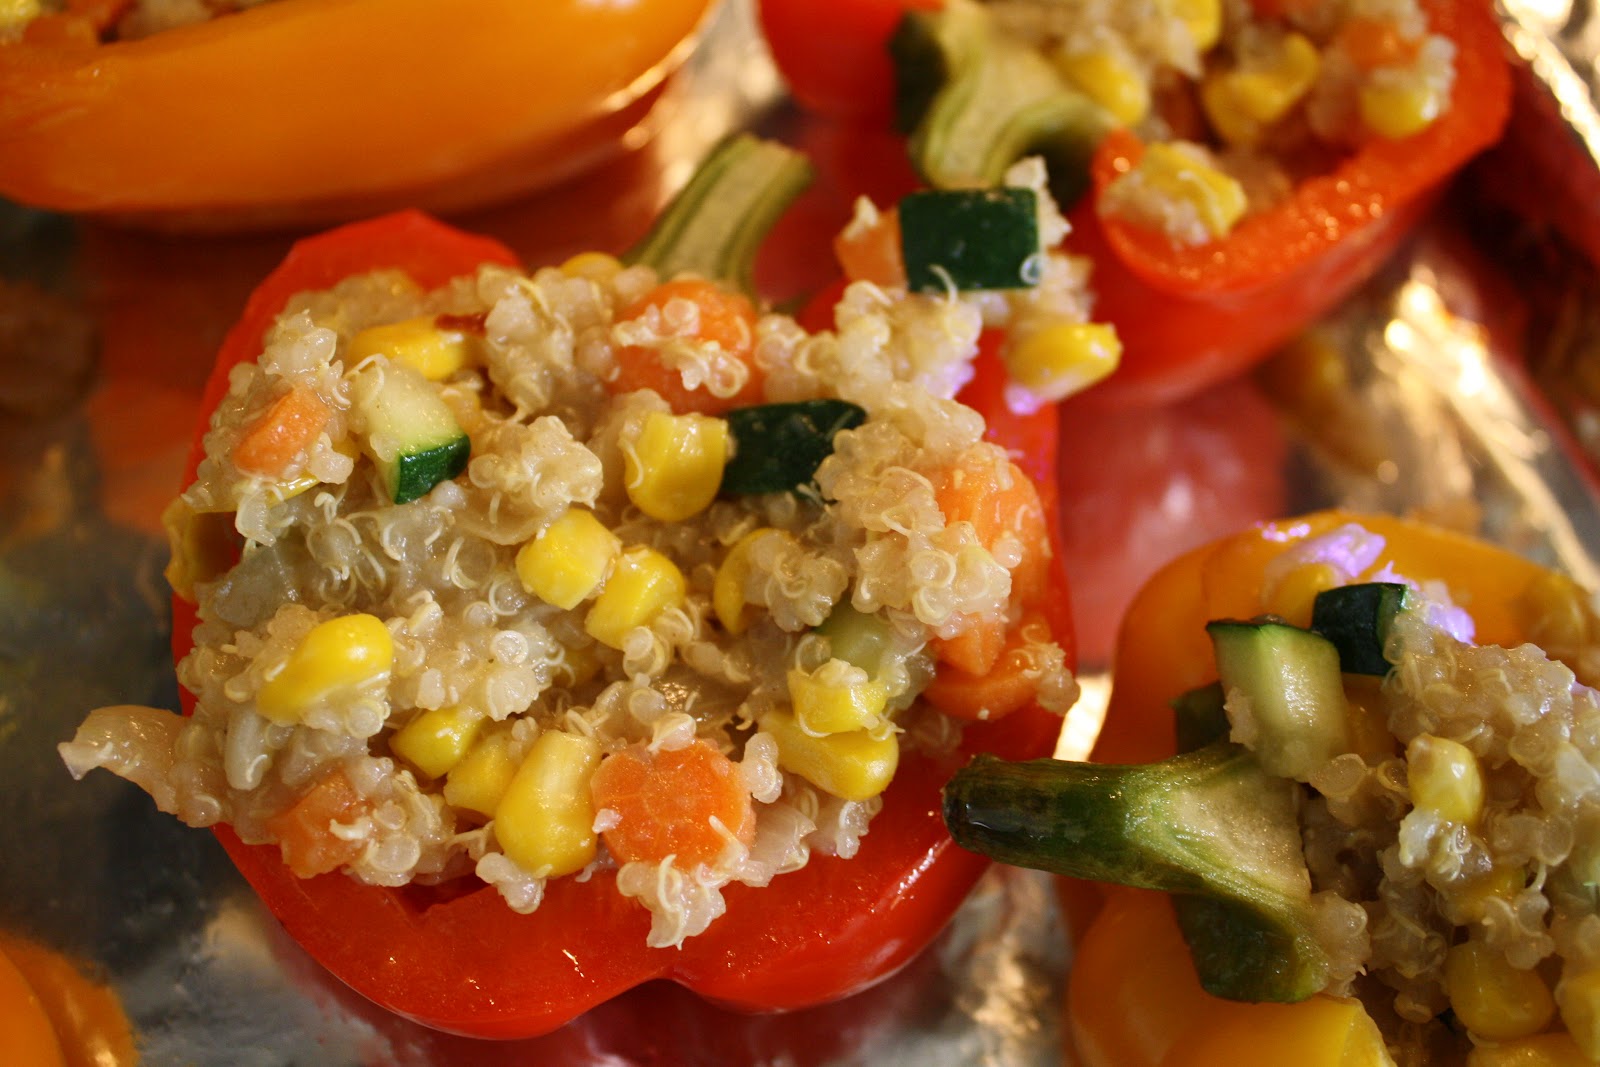
Dinner Tonight: Quinoa Stuffed Peppers for a Crowd

12:26 PM 2 Comments
This week's menu was largely inspired by this week's sale paper; when peppers go on sale (10 for $10!), we eat a lot of peppers in a lot of different colors for a lot of nights in a row. Since I had recently made my standby roasted red pepper soup, I went searching for something new. This was a delicious and beautiful meal that I found in Moosewood Restaurant New Classics, a favorite tome of mine. The cookbook recommends serving the peppers with a tangy salad, which would be lovely, but I think it would also be great with black beans on the side. You could also serve it with eggs as a brunch dish.


This makes a lot of peppers - between the four of us, we ate five halves, saved one, and packed the other six up for a friend who just had a baby (you know who you are!). While there is a bit of preparation involved in this meal, you could make and stuff the peppers in advance then do the final bake just before dinner.

Enjoy!

Quinoa Stuffed Peppers
Adapted from Moosewood Restaurant New Classics
Serves 6

PRINT ME!

1 cup raw quinoa
6 medium bell peppers, any color
3 tbsp. olive oil
1 cup chopped onion
3 garlic cloves, minced
1 tbsp. cumin
1 1/2 tsp. coriander
1/2 tsp. crushed red pepper
1/2 tsp. salt, or more to taste
1 cup peeled and diced carrots
1 cup diced zucchini
1 1/2 cups frozen corn
1 1/2 cups shredded Cheddar cheese

Preheat the oven to 400 degrees.

Place the quinoa in a fine mesh sieve and rinse well under running water. In a covered pot, bring quinoa and 2 cups of water to a boil. Lower the heat and simmer for about 15 minutes, until the quinoa is soft and the water is absorbed.

While the quinoa cooks, cut the peppers in half lengthwise and, leaving the stems intact, seed them. Brush the peppers on both sides with oil. Place peppers cut side down on an oiled baking sheet and roast for 15-20 minutes, until softened and slightly browned but not collapsed. When the peppers are roasted, remove from oven to cool and reduce the heat to 350 degrees (or turn off oven if you are going to bake them much later).

In a large skillet, warm 1 tbsp olive oil and saute the onions and garlic on medium heat for about 5 minutes, until the onions have softened. Stir in the spices, carrots, zucchini, and corn. Cover the pan and cook for 10 minutes, until the vegetables are very tender.

Combine the sauteed vegetables and the cooked quinoa and add salt to taste. Turn over the pepper shells and spoon filling into each half. Sprinkle each bell pepper half with some cheese. Bake 10 to 15 minutes, until the filling is hot and the cheese is melted.

Thursday, February 23, 2012

Dinner Tonight: Chico's Roasted Red Pepper Soup

3:08 PM 1 Comments
I'd say that nearly 90% of what I cook for dinner can be made in 45 minutes or less, and I would venture to guess that the same is true for many of you. I put a lot of effort into planning and making good meals for my family, but I generally avoid recipes that require a lot of time; I'd rather spend that time with aforementioned family, after all. There are, however, a handful of super special recipes in my stash that take a lot of time and effort but that are so worth the time and effort. This recipe is one of those.


If you ever have the opportunity to visit Chico Hot Springs in Pray, Montana, do. It is an incredibly special place with a rich history, year-round geothermally heated pools, and an amazing gourmet restaurant. It also happens to be up the road from Yellowstone National Park and in the foothills of the Absaroka Mountains. I have been fortunate enough to spend some time at Chico, and on my first visit, I picked up their cookbook, A Montana Table by Seabring Davis. Of all the recipes I've made from this book, this recipe for Roasted Red Pepper Soup is the one I go back to again and again.  


The recipe as transcribed below includes several tweaks I have made over the years. Additionally, here are a few tips:

- The original recipe calls for 2 quarts of homemade chicken stock. I have always used vegetarian Better than Bouillon to keep the recipe meatless.

- I typically take two days to make this recipe - one to roast, peel, and seed the peppers and a second to throw the soup together. I have always used fresh bell peppers (this is my go-to recipe when red peppers are really cheap at the farmer's market) but I suppose you could use jarred. Eight peeled and seeded roasted peppers yields about 3 cups.

- The recipe calls for 1 cup of sherry. I typically use super cheap cooking sherry with great results. You can also use red wine if that is what you have around.

- Because the soup gets pureed in the end, don't waste your time with precision cutting on the veggies. Just give them a rough chop.

- The original recipe has 1/2 tsp saffron whisked in with the cream. I have always skipped this since I generally don't have saffron around, but if you do, by all means use it.

- As noted in the cookbook, you can add steamed mussels, clams, or other shellfish as a last-minute topping. You can also add a generous sprinkling of Parmigiano Reggiano.

Enjoy!

Image courtesy of A Montana Table


Roasted Red Pepper Soup
Adapted from A Montana Table

PRINT ME!

6 to 8 large red bell peppers
2 quarts soup stock
canola oil
2 large yellow onions, peeled and chopped
1 large carrot, peeled and chopped
4 large shallots, peeled and chopped
4 stalks celery, chopped
3 cloves garlic, peeled and chopped
28 oz can crushed tomatoes
1 cup sherry, divided
1 cup heavy whipping cream
Juice of 1 lemon
1/2 tsp of hot sauce (optional but oh-so-good)
salt and pepper to taste

1. Roast whole red bell peppers over an open flame on a gas burning stovetop or grill; remove from flame when skin is mostly blackened and immerse in an ice bath to remove skin easily. Seed and dice. ALTERNATE METHOD: Roast peppers in a 450 degree oven, turning occasionally, until blackened. Put peppers in a paper bag and close the top for 10-15 minutes to loosen the skin. Peel, seed, and dice. Set aside. (Can be done one day ahead - store in fridge).


2. In a large soup pot, warm stock on medium-high heat until boiling. Add roasted red peppers and let simmer.

3. Heat a large saute pan with canola oil and saute onion, carrot, shallots, celery, and garlic until browned (about ten minutes). Add tomatoes and heat through. Transfer vegetables to soup pot. Use 1/2 cup sherry to deglaze the saute pan and add to soup pot. Cook over medium-high heat, allowing mixture to reduce to half, about 1 1/2 hours, stirring occasionally.

4. The next step is to puree the soup. I have found that this is both difficult and dangerous to do while the soup is hot unless you have an immersion blender. If you don't, let it cool a bit before transferring it to a blender or food processor and pureeing until smooth.

5. Return to soup pot on low heat. Whisk in cream, lemon juice, remaining 1/2 cup sherry, and the optional hot sauce. Add salt and pepper to your taste, simmer for ten minutes, and serve!

Friday, January 20, 2012

Thinking about Bread

6:56 AM 0 Comments
When I started this blog back in October, one of my goals was to bake more bread. I'm now several months in and, looking back, I've done alright. I feel like with every new bread recipe, I get a better sense of the basics of breadmaking, and I've enjoyed seeking out new recipes to try. If Finn does indeed become a baker, maybe I can convince him to give me a few shifts in his bakery.

I think one of the greatest lessons I've learned is that baking a homemade loaf of bread does not have to be that difficult. It takes some time (though, in many instances, not as much as I would have guessed), but the hands-on is fairly minimal and the payoff extraordinary. The cost effectiveness is pretty remarkable, too, when I see what the grocery store bakery charges for a loaf of whole wheat artisanal bread. Admittedly, I have the privilege of being home with my boys this year so I can get a loaf of bread going in the morning while they are playing...but I think I could just as easily make a loaf in the evening in the hours between dinner and bedtime. Bread turns a simple dinner (soup, for example) into something kind of special; I think of it as an upgrade of sorts. It also makes your house smell really good.

Today is a great example of the use of bread to step up a meal. My friend dropped off a great big container of gumbo for our family to try for dinner. Since the effort required by me for this meal is exactly zero, I thought I'd make some bread to go with it. I found an interesting recipe in what I think is the very first cookbook I ever owned: Mollie Katzen's The Enchanted Broccoli Forest (1995 edition). I remember getting my hands on this book when I was in college and realizing for the first time that cooking could be a joyous process as well as a means to an end. It's still one of my favorites. As an added bonus, it's got a great basic illustrated guide to making yeast breads that is super useful for getting started.

I was looking for something kind of dense and flavorful, and I came upon this recipe. Unlike most of the breads I've been baking lately, this is not a yeast bread. Rather, it's a savory batter bread. I honestly don't think I've ever made a savory batter bread before; batter breads in my world generally come with bananas or pumpkin in them. The wonderful advantage to a batter bread is that it takes minutes to throw together and is then ready to put in the oven; no rising, no punching, no kneading. I made the recipe exactly as written  and it turned out really well. I think I would cut back on the sugar next time, as it was a bit too sweet in combination with the herbs, but I will definitely be making this again. I would also consider trying different herb combinations, or maybe different savory ingredients like olives or sun dried tomatoes.  I didn't get any help from Finn on this one; in fact, I had it made and in the oven before he even realized I was making bread. Emmett was in the mei tai, so I guess I can give him a cooking credit here.

Yogurt and Herb Bread
adapted from The Enchanted Broccoli Forest

PRINT ME!

15 minutes to prepare (seriously!)
40 to 45 minutes to bake
Yield: 1 medium sized loaf

a little butter or oil for the pan
1 cup unbleached white flour
1 cup whole wheat flour
1 tsp. baking powder
1/2 tsp. baking soda
3/4 tsp. salt
1 cup plain yogurt
5 tbsp. melted butter
2 eggs
1/3 cup honey or sugar
2 tsp. dill
1 tsp. oregano
1 tsp. thyme
1 tsp. basil

1. Preheat oven to 350 degrees. Lightly grease a medium sized loaf pan.

2. Sift together the flours, baking powder, baking soda, and salt into a large bowl. Stir in the dried herbs.

3. In a separate bowl, beat together the yogurt, butter, eggs, and honey/sugar.  Pour this mixture into a well in the dry ingredients.  Mix with a wooden spoon until thoroughly blended (it will be stiff).

4. Spread into the prepared pan and bake for 40 to 45 minutes, or until a knife inserted in the center comes out clean. Let it sit for about 5 minutes then rap the pan sharply to remove the bread.  Cool on a rack for at least 20 minutes before slicing.

Wednesday, January 18, 2012

The Recipe Conundrum

2:06 PM 5 Comments
If your love for cooking and recipes is anything like mine (and I would venture to guess that for many of you it is), you have a recipe problem. Not a problem with the recipes per se but a problem with organizing the recipes in a way that they are usable. They are everywhere, in all kinds of formats, and they are driving me bananas.

Way back when I was in library school, I picked up a key phrase in the world of library and information science. It went something like this: information is only as usable as it is findable. I'm sure that the scholar who coined the phrase said it far more elegantly than that, but you get the idea. What's the point of having a bazillion recipes if, when you are making your grocery list for the week, you can't find the recipe you want?

At present, my recipes are in the following places:
  • in cookbooks - These are the easiest to find as they have indexes and are all together on a shelf. They subsequently get used the most.
  • in magazines - If the magazine in question is Everyday Food, then they are on the top shelf in chronological order going back to 2005. A print index is occasionally released, and I think there is an index on the website as well. If the magazine in question is any of the countless other magazines to which I subscribe, the recipes are likely still in the magazine with the corners bent over. They are then in a huge pile waiting for the day when I get a system figured out. On a side note, I find it hilarious that all of my January magazines want me to "get organized" when one of the areas in my life most needing organization is...figuring out what to do with my magazines.
  • in a folder on my hard drive - Those that I download from the Internet get saved in an aptly named "Recipes" folder. This does not mean I ever look at them again.
  • in a folder in my email - Those recipes that I receive by email often end up here. Per the above re: ever looking at them again.
  • in my allrecipes account - Those recipes that I save in allrecipes get saved in the "recipe box" feature.  The catch is remembering what recipes I saved there when I am looking for a recipe.
  • on my pinterest board - Again, there if I remember to look.
  • on sheets of paper in a folder on my shelf - These are generally recipes that I find online then print out or recipes that I photocopy from books I check out from the library. This collection may also include recipes clipped from magazines or recipes given to me by friends. To be filed into aforementioned desired system, of course.
  • on this blog - With a grand total of 33 entries at present, I can generally remember what recipes I've included here...for now.

Does anyone out there have this figured out? Or have any brilliant ideas?Anyone?


Tuesday, January 17, 2012

Snow Day Bread

6:13 PM 2 Comments
We finally got some snow here in central Illinois. My kids spent an entire morning watching it accumulate before I deemed it time to get dressed and head out into the long-awaited winter wonderland.


While waiting for the snow to fall, Finn and I baked a loaf of bread.  The recipe came from a cookbook that he picked up at the library last week. For the last six months or so, Finn has been consistently declaring that he wants to be a baker when he grows up. His determination to be a baker is so set that if he comes up with another career objective, it is always preceded by his baking tenure (e.g. "After I'm a baker, I think I'll be someone who drives a boat"). In fact, Santa (and Melissa & Doug...) even brought him a baker's costume for Christmas:


The cookbook is called The Children's Baking Book and it's published by DK. As a K-5 school library media specialist, I am intimately familiar with cookbooks for kids; they are heavily used and I have purchased a lot of them over the years. The DK ones are good - full of step-by-step directions, lots of color photographs, and, for the most part, yummy recipes. Because many of them were initially published in Great Britain, there are sometimes ingredients that may not sound familiar. For example, many recipes in this book call for "golden syrup" which, as far as I know, is not something readily available in the States (it recommends substituting with equal parts light corn syrup and honey). Alternatives are generally given (or you can figure them out, as in "dessicated coconut" in place of "shredded coconut"), so this by no means affects the usability of the book.

We picked this recipe in large part because Finn liked the picture. And what is wrong with that, really? It's a lovely multigrain bread that has lots of aesthetic appeal because it is braided rather than loafed. It turned out very nicely and was the perfect accompaniment to big bowls of borscht (I do love me some beets) on a snowy night. I don't typically include step-by-step pictures with my recipes, but I did take a few of the braiding process for your reference.

Multigrain Braid
adapted from The Children's Baking Book

PRINT ME!

1 1/2 tsp active dry yeast
1 tsp sugar
3/4 cup lukewarm water
4 cups multigrain bread flour (I used half white and half whole wheat)
2 tsp salt
1 oz. butter
extra flour for dusting
oil for bowl and baking sheet

1. Place the yeast, sugar, and 1/4 cup of the water in a small bowl.  Stir well and leave in a warm place for ten minutes, until the mixture turns frothy.

2. Place the flour and salt in a large mixing bowl. Cut in the butter until it is thoroughly mixed in.

3. Make a well in the center and pour in the frothy yeast mixture and remaining water.  Stir with a wooden spoon to form a dough, then use your hands to form a ball.

4. Knead the dough on a lightly floured surface for ten minutes, until the dough is smooth and elastic.

5. Place the dough in a lightly oiled bowl, cover with a clean, damp dish towel, and leave to rise in a warm place for an hour, or until it has doubled in size.

6. Preheat the oven to 425 degrees. Lightly grease a baking sheet. Place the dough on a lightly floured surface.  Lightly punch down the dough.

7. Shape the dough into a rectangle, then cut it into three equal pieces.  Use your hands to roll each piece of dough into a 12" long "sausage."


8. Make an H with the dough pieces, weaving the middle piece over the piece on the left and under the piece on the right.


9. Braid from the center downward, then turn the dough around and repeat (this doesn't exactly work out, you have to kind of twist it to make the second part of the braid. Or at least I did).


10. Tuck the ends under and place on the baking sheet. Leave to rise for another 30 minutes. Bake for 30 minutes, or until hollow when tapped. Remove from the pan and let cool.

Friday, October 28, 2011

Dinner Tonight: Rustic Caramelized Onion Tart

9:41 PM 1 Comments
Remember a few weeks back when I said that we don't eat much meat in our house? We don't. But we really like bacon. A Lot. I came across this recipe in a cookbook I recently picked up at my grocery store. It's published by Philadelphia Brand Cream Cheese, and they were running a promotion that if you purchased three Philadelphia products, you got the cookbook for free. I happened to be shopping for my younger son's birthday party, and, between dips and frosting, birthday parties around here require a lot of cream cheese. So I grabbed the cookbook ("a $19.99 value!") before checking out. The cookbook is called Spread a Little Joy, and it is available for purchase from Amazon. It's actually a great book, with a lot of yummy recipes and nicely reproduced full color photography. I've tried a few things over the last few months, and they've all been good.

But back to bacon. I was looking for something to go with soup. We eat a lot of soup, both homemade and canned, so I'm often looking for interesting accompaniments - breads, sandwiches, rolls, breadsticks, paninis, etc. This recipe was actually listed in the appetizers section, but it was the perfect dish to serve on a drippy fall day with big steaming bowls of tomato soup. Besides being super delicious, it was easy to make and visually impressive. The recipe claims twelve appetizer size portions; we sliced it into eight wedges and ate every crumb.

Rustic Caramelized Onion Tart
Adapted from Spread a Little Joy

PRINT ME!

1 large onion, thinly sliced
8 slices bacon, chopped
1 ready-to-use refrigerator pie crust (1/2 of 15 oz. package)
1 8 oz. package cream cheese (I used 1/3 less fat with no obvious problems), softened
1/4 cup sour cream (again, used the lowfat version)
1/2 cup shredded Swiss cheese (I used a fancy block of Gruyere de Comte; I'm sure Swiss would be fine)

1) Cook onions and bacon in skillet on medium-high heat 10 to 12 minutes or until onions are tender, stirring frequently.

2) Heat oven to 400 degrees. Unroll pie crust on baking sheet. Mix cream cheese and sour cream; spread onto crust. Spoon onion mixture onto center of crust, leaving two-inch border. Sprinkle with cheese. Fold border over filling, leaving opening in center and pleating crust as necessary to fit.

3) Bake 12 to 15 minutes or until crust is lightly browned. Cool slightly.

Thursday, October 20, 2011

Dinner Tonight: Oven Roasted Tomatoes

5:51 AM 0 Comments
I love Everyday Food Magazine. Love it. I love the handy little digest size.  I love that everything I make from this magazine looks exactly like the pictures. I love that I actually make things from this magazine the day that it comes. It is the only cooking magazine I get that I actually keep in its entirety and use and reuse, and some of my all-time favorite recipes come from here. I cannot recommend it enough to people who enjoy simple, flavorful recipes, lots of variety, and a user-friendly approach to cooking. So if you haven't tried it out, do.

One of my recent favorite go-to recipes - Oven Roasted Tomatoes - comes from their "Secret Weapon" feature. The idea is that you can make one base recipe (in this case, oven roasted tomatoes) then adapt it slightly to make several simple variations. Since this was published in November 2010, I think I have made it a dozen times for my own family and just as many times for others. It's a great recipe for those nights when you find yourself at the grocery store with nary a plan for dinner as it is easy to remember and quick to assemble. It does require some roasting time, but that is completely hands-off. If you are feeling ambitious (and have a pasta machine), it's great pureed with a little cream and tossed with homemade noodles.

Oven Roasted Tomatoes
adapted from Everyday Food Magazine, Issue 77 and here 

PRINT ME!

Preheat oven to 400 degrees.  Place 2 cans (28 oz. each) whole peeled tomatoes in a large roasting pan.  Use your hands to roughly tear the tomatoes up. Add 3 garlic cloves, smashed and peeled, and drizzle 3 tablespoons of olive oil over the top.  Roast until mixture thickens, 70 to 80 minutes, rotating and stirring halfway through. Makes 4 cups.


 Things to do with oven roasted tomatoes:
  • spread on crusty bread
  • spoon over roasted eggplant or zucchini halves
  • add to spaghetti and top with grated cheese
  • puree with cream or milk for a quick pasta sauce (my favorite!)
  • toss with steamed vegetables as a side
  • spoon over cooked chicken breasts and top with mozzerella

Monday, October 17, 2011

Soup and Bread Sunday

7:16 AM 2 Comments
When it comes to cooking, I am constantly on some kick or another. I rely heavily on the cookbook section of my library to support my changing moods and will post frequently here about the many cookbooks I check out. My kicks run the gamut from slow cooker recipes to low fat recipes to five ingredient recipes to meatless recipes to cheap recipes to all of the above (not easy to find, I might add).  Sean and I recently watched the film Forks Over Knives and it led to a lot of discussion about the foods we eat. We were both vegetarian for many years before moving to Mongolia for Peace Corps (that's where we met), where vegetarianism isn't really an option. And while we do eat meat now, we don't eat much. The film really impacted both of us, mostly because we both have family members dealing with the health issues addressed in the film.  Anyway, in the weeks following, I have had some different approaches to cooking, two of which worked their way into tonight's dinner.

Quinoa.  The stuff is amazing! A complete protein source and full of essential amino acids, it has the added benefit of also being really pretty; when you cook it up, the grains separate into delicate little curlicues.  The other featured component of tonight's dinner was part of my effort to bake more bread from scratch; I made two loaves of multigrain bread based on the recipe on the back of a bag of wheat bran that I found in the cupboard.  The bread was very good, though I'd probably use part whole wheat flour the next time I make it. All in all, it was a delicious dinner and received rave reviews from all around (except from Emmett, who dumped not one but two bowls onto the floor...)


South American Quinoa and Corn Soup
(adapted from Vegetarian Soup Cuisine)

PRINT ME!


1 tbsp canola oil
1 medium yellow onion, diced
1 red pepper, seeded and diced
2 celery stalks, sliced
3 cloves garlic, minced
1 jalapeno pepper, seeded and minced
1 14.5 oz can diced tomatoes in juice
1 1/2 tbsp dried parsley
2 tsp paprika
6 cups vegetable broth (I use Better than Bouillon) or water
1/2 cup quinoa, rinsed
2 cups frozen corn kernels
1 15 oz can red kidney beans, drained

In a large saucepan heat the oil.  Add the onion, bell pepper, celery, garlic, and jalapeno and saute for about 5 minutes.  Add the tomatoes and seasonings and saute for 3 to 4 minutes more, until the mixture forms a thick pulp.

Add the broth, quinoa, and corn and cook for 25 minutes over medium-low heat, stirring occasionally.  Stir in the beans and cook for about 5 minutes more. Let the soup stand for 10 minutes before serving.

Multigrain Bread
(adapted from the label of Bob's Red Mill Wheat Bran)

PRINT ME!

1 cup water
1 cup plain yogurt
1/4 cup canola oil
1/2 cup oatmeal, uncooked
1/3 cup wheat germ
1/3 cup wheat bran
5 to 5 1/2 cups unbleached white flour (see note above)
1/4 cup packed brown sugar
2 packages fast-rising yeast
2 tsp salt
1 egg

Heat water, yogurt, and vegetable oil to boiling.  Transfer to large bowl. Stir in oatmeal, wheat germ, and wheat bran.  Set aside for 30 minutes.

Meanwhile, in a large bowl, combine 1 cup flour, sugar, yeast, and salt.  Stir in cooled bran mixture, 1 egg, and enough remaining flour to make soft dough. Knead on lightly floured surface until smooth and elastic, about 6 to 8 minutes.  Cover and let rest 10 minutes.

On a lightly floured surface, divide dough in half.  Roll each half into a rectangle, 7" by 12".  Roll up tightly from short end.  Pinch seams and ends to seal.  Place seam side down in two greased loaf pans.  Cover and let rise in a warm, draft-free place until doubled, about 30-45 minutes.

With sharp knife, make three short diagonal slashes, 1/4" deep, on each loaf.  Bake at 375 for 25-30 minutes or until done. Remove from pans; cool on wire racks.
